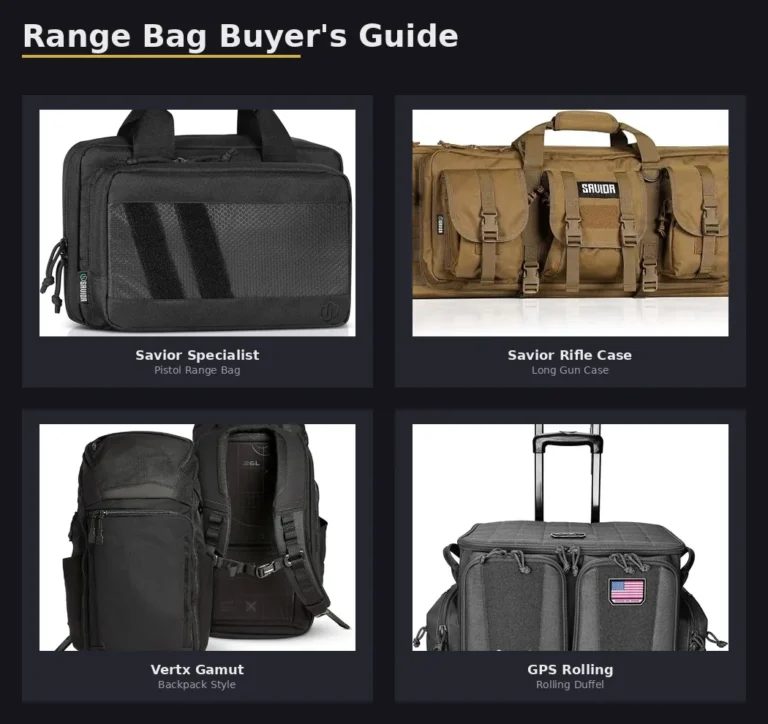
- TL;DR – Quick Summary for Fast Readers
- Essential Tools Needed for Sig P320 FCU Disassembly & Reassembly
- Video Index
- How to Disassemble the P320 FCU
- How to Remove the Sig P320 FCU from the Grip Module
- How to Remove the P320 Trigger and Trigger Bar
- How to Remove the P320 Slide Catch Lever
- How to Remove the P320 Takedown Safety Lever
- How to Remove the P320 Sear and Safety Lifter
- How to Remove the P320 Sear Housing
- How to Reassemble the P320 FCU
- How to Install the P320 Sear Housing
- How to Install the P320 Safety Lifter and Sear
- How to Install the P320 Takedown Safety Lever
- How to Install the P320 Slide Catch Lever
- How to Install the P320 Trigger Bar and Trigger
- Frequently Asked Questions (FAQ) About Sig P320 FCU Disassembly & Reassembly
- 1. What is the Sig P320 FCU?
- 2. Do I need special tools to disassemble the Sig P320 FCU?
- 3. Can I remove the Sig P320 FCU without taking apart the slide?
- 4. How often should I clean my Sig P320 FCU?
- 5. Where can I buy replacement parts for my Sig P320 FCU?
- 6. How do I ensure my Sig P320 FCU is assembled correctly?
- Final Thoughts
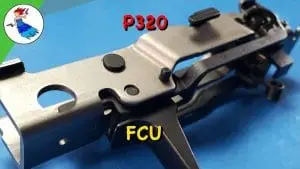
How Do You Disassemble & Reassemble the Sig P320 FCU? (Complete Guide)
The Sig P320 FCU (Fire Control Unit) is the heart of this modular handgun system. Whether you’re upgrading components, troubleshooting, or performing routine maintenance, understanding how to disassemble and reassemble the Sig P320 FCU is essential. This guide provides step-by-step instructions to help you maintain your Sig P320 FCU safely and efficiently.
TL;DR – Quick Summary for Fast Readers
-
Always unload your firearm before working on it.
-
The Sig P320 FCU can be removed from the grip module for easy maintenance.
-
Each component, including the trigger, slide catch lever, and sear housing, must be removed in a specific order.
-
Proper alignment of springs and pins is crucial during reassembly.
-
Regular cleaning and lubrication keep the Sig P320 FCU functioning properly.
-
Use high-quality tools like a punch set and bench block for best results.
-
Get $20 of free ammo at Ammo Squared.
-
Keep your P320 clean with Aegis Gun Care—use BOOMLUBE for 10% off at trb.fyi/boomlube.
Essential Tools Needed for Sig P320 FCU Disassembly & Reassembly
Keeping all removed parts organized will make reassembly much easier.
-
5/64″ punch – Required to remove the trigger and sear housing pins.
-
3/32″ roll pin punch – Helps with sear housing pin installation.
-
Bench block – Provides stability when driving out pins.
-
Gunsmithing hammer – Ensures precise pin removal.
-
Needle-nose pliers – Helps handle small springs and levers.
-
Gun lubricant and cleaning kit – Keeps the FCU operating smoothly, like Aegis Gun Care.
-
Protective mat or towel – Prevents small parts from getting lost.
-
Good lighting – Ensures you can see every detail while working.
To safely disassemble and reassemble the Sig P320 FCU, you need a few basic tools. A 5/64″ punch is required to remove the trigger and sear housing pins. A 3/32″ roll pin punch helps with sear housing pin installation. A bench block provides stability when driving out pins, while a gunsmithing hammer ensures precise pin removal. Needle-nose pliers help handle small springs and levers. To keep your Sig P320 FCU operating smoothly, use a gun lubricant and cleaning kit like Aegis Gun Care. A protective mat or towel prevents small parts from getting lost, and good lighting ensures you can see every detail while working.
Keeping all removed parts organized will make reassembly much easier.
Video Index
This section provides a breakdown of the key steps in disassembling and reassembling the Sig P320 FCU. Use the timestamps below to quickly find specific sections in the instructional video:
-
Introduction to the Sig P320 FCU Disassembly and RE-Assembly – 0:00
-
How to Remove the P320 Trigger and Trigger Bar – 0:01
-
How to Remove the P320 Slide Catch Lever – 1:27
-
How to Disconnect the P320 Takedown Safety Lever – 2:18
-
How to Remove the P320 Sear and Safety Lifter – 3:07
-
How to Remove the P320 Sear Housing – 4:58
-
How to Assemble the P320 Sear Housing – 6:09
-
How to Install the P320 Sear Housing – 6:52
-
How to Install the P320 Safety Lifter and Sear – 8:10
-
How to Install the P320 Takedown Safety Lever – 11:38
-
How to Install the P320 Slide Catch Lever – 12:15
-
How to Install the P320 Trigger Bar and Trigger – 13:07
Step-by-Step Guide to Disassembling and Reassembling the Sig P320 FCU
How to Disassemble the P320 FCU
How to Remove the Sig P320 FCU from the Grip Module
First, ensure your firearm is completely unloaded. Remove the magazine and lock the slide to the rear. Check the chamber to confirm it is empty. Once verified, release the slide and rotate the takedown lever downward. The FCU can now be lifted out of the grip module.
How to Remove the P320 Trigger and Trigger Bar
Push the trigger all the way forward before attempting removal. Use a 5/64″ punch to remove the trigger pin while being careful not to bend the trigger return spring. Gently pull the trigger bar downward and away from the safety housing, ensuring it clears the back of the housing. Once the trigger bar is free, slide it out and remove the trigger spring from the frame.
How to Remove the P320 Slide Catch Lever
Use a punch to push the slide catch lever pin from the right side of the frame. Once loose, remove the slide catch lever and spring assembly. Set these parts aside for reassembly later.
How to Remove the P320 Takedown Safety Lever
Locate the takedown safety lever on the left side of the frame. Some models have a staked-in trigger stop pin, which may prevent removal. If yours is removable, use a punch to carefully drive it out. Pull back on the lever and slide it sideways to remove it from the frame.
How to Remove the P320 Sear and Safety Lifter
Push out the safety lever pivot pin from the right side of the frame. If your P320 has a large-cap pin, remove it from the right side. If it has a small-cap pin, remove it from the left. Next, push out the sear pivot pin from the left side and remove the sear, safety lever, and safety lever spring.
How to Remove the P320 Sear Housing
The sear housing is held in place by a roll pin at the back of the frame. Use a 3/32″ roll pin punch to drive out the pin. Rotate the housing to the rear and lift it from the frame. If your firearm includes a disconnector, remove it now.
How to Reassemble the P320 FCU
How to Install the P320 Sear Housing
Insert the takedown safety lever spring into the left side of the sear housing. If your firearm has a disconnector, install it on the right side. Position the sear housing into the rear of the frame, aligning the holes. Use a 5/64″ punch to hold everything in place, then insert the roll pin to secure it.
How to Install the P320 Safety Lifter and Sear
Install the safety lifter, safety lever, and sear in reverse order of removal. If your firearm has sear springs, apply a small amount of grease to keep them in place before inserting the sear pivot pin.
How to Install the P320 Takedown Safety Lever
Slide the takedown safety lever back into position, ensuring it locks properly into place.
How to Install the P320 Slide Catch Lever
Place the slide catch lever spring assembly into the frame. Align the slide catch lever and push the pin into place from the left side.
How to Install the P320 Trigger Bar and Trigger
Install the trigger spring into the frame, ensuring it hooks securely. Attach the trigger bar to the spring and rotate it under the slide catch lever. Align the pin in the back of the trigger with the hole in the trigger bar before fully seating the assembly.
Frequently Asked Questions (FAQ) About Sig P320 FCU Disassembly & Reassembly
1. What is the Sig P320 FCU?
The Sig P320 FCU (Fire Control Unit) is the serialized part of the firearm, housing essential components like the trigger, sear, and safety mechanisms. It is modular and can be swapped between different grip modules and slides.
2. Do I need special tools to disassemble the Sig P320 FCU?
Yes, you will need a 5/64″ punch, a 3/32″ roll pin punch, and a bench block for safe disassembly and reassembly.
3. Can I remove the Sig P320 FCU without taking apart the slide?
Yes, you can remove the Sig P320 FCU from the grip module without disassembling the slide. However, always ensure the firearm is completely unloaded before starting any work.
4. How often should I clean my Sig P320 FCU?
Regular cleaning is recommended every 500-1,000 rounds or whenever the firearm is exposed to dirt, moisture, or extreme conditions.
5. Where can I buy replacement parts for my Sig P320 FCU?
OEM replacement parts can be purchased directly from Sig Sauer or reputable firearm parts retailers.
6. How do I ensure my Sig P320 FCU is assembled correctly?
After reassembling the Sig P320 FCU, perform a function check to ensure proper operation.
Final Thoughts
Maintaining your Sig P320 FCU properly is an essential part of ensuring your firearm functions safely and reliably. Taking the time to carefully follow each disassembly and reassembly step will help you avoid unnecessary wear or potential malfunctions. Always double-check your work, particularly the alignment of pins, springs, and safety components.
It is important to note that firearm maintenance and modifications come with responsibility. This guide is provided for informational purposes only. I am not a licensed or certified gunsmith/armorer, and any modifications or disassembly you perform are at your own risk. Improper assembly or modification could impact the functionality and safety of your firearm. If you are unsure or encounter issues, consult a professional gunsmith or Sig Sauer-certified armorer for assistance.
If you found this guide helpful and want to support more content like this, consider checking out Ammo Squared for $20 in free ammo at trb.fyi/a2, or keep your P320 running smoothly with Aegis Gun Care—get 10% off at trb.fyi/boomlube.
By taking responsibility for your firearm maintenance, you ensure a safer and more reliable shooting experience. Stay informed, stay safe, and always practice proper firearm handling. If you have any questions or experiences to share, feel free to join the conversation in the comments section or check out more firearm maintenance content on our website.
Join The Rogue Nation!
Stay in the Loop with Real-World Gun Maintenance
No spam. Just proven firearm maintenance tips, gear reviews, and DIY builds, straight from a former gunsmith and 2A educator.
You’ll get:
DIY gunsmithing insights backed by experience
Behind-the-scenes builds from The Rogue Banshee
First access to new disassembly & troubleshooting guides
Tools and fixes that actually work
Support & Resources:
Love what I do here? Here’s how to support the mission and gear up::
• Shop Tools & Parts: trb.fyi/az
• TRB Merch: trb.fyi/merch
• YouTube Members Perks: trb.fyi/ytmembers
• All Resources in One Place: link.trb.fyi
Credits and Socials:
Connect with Me:
Follow for tools, tips, and teardown walk-throughs:
• Instagram – Behind-the-scenes shop content
• Facebook – Community posts & guide drops
• Twitter – Quick rants, 2A news, and hot takes
• Website – Full archive of all TRB content
Credits:
Original Content by The Rogue Banshee / My Rogue Solutions LLC.
Credit: Jason Schaller
Email: jschaller@trb.fyi
About the Author: Jason Schaller is a former FFL holder and founder of Eagle Eye Shooters Supply in Helena, MT, where he provided professional gunsmithing services and guided customers on all aspects of firearms ownership. Today, he teaches DIY gunsmithing at The Rogue Banshee and serves as a Chief Instructor at Freedom Crew University. With over a decade of hands-on professional experience with firearms and nearly 30 years in IT, Jason also holds top cybersecurity certifications including CISSP, CISA, and CRISC. When he’s not geeking out, he’s helping others build self-reliance, critical thinking, and firearms proficiency through real-world content.
Disclaimers:
Content Use & Compliance
The videos, articles, and images shared by The Rogue Banshee feature gear, tools, and products for informational and entertainment purposes only. All activities follow local, state, and federal laws where they were conducted in. All activities are conducted safely under professional supervision in approved locations.
Affiliate Disclaimer
Some links are affiliate-based. No extra cost to you, but they help support the work we do her when you purchase though them. Best of all, you support the content you want to see, hear and read with nothing out of your pocket.
Firearm Safety Notice
I promote safe and responsible firearm ownership. All activities are conducted in a controlled, professional environment.