- Video Walkthrough
- Video Summary
- Video Chapters
- Inspector Checklist: Before You Start
- Tools and Parts Checklist
- Recommended Tools
- Wiley X Rogue Safety Glasses
- Aegis Gun Care: Cleaner, Lube & Grease
- Step 1: Install the Beretta Cheetah 85 Magazine Release
- Step 2: Install the Beretta Cheetah Ejector and Hammer Stop
- Step 3: Install the Beretta 84 and Beretta 85 Hammer
- Step 4: Install the Beretta Cheetah Sear
- Step 5: Install the Beretta 84 and Beretta 85 Mainspring
- Step 6: Install the Beretta 84 and Beretta 85 Trigger and Trigger Spring
- Step 7: Install the Beretta Cheetah Slide Release Lever
- Step 8: Install the Beretta Cheetah Trigger Bar
- Step 9: Install the Beretta 84 and Beretta 85 Safety
- Step 10: Install the Beretta Disassembly Latch and Grips
- Maintenance
- Quick Troubleshooting
- Extended FAQ
- Final Thoughts
Video Walkthrough
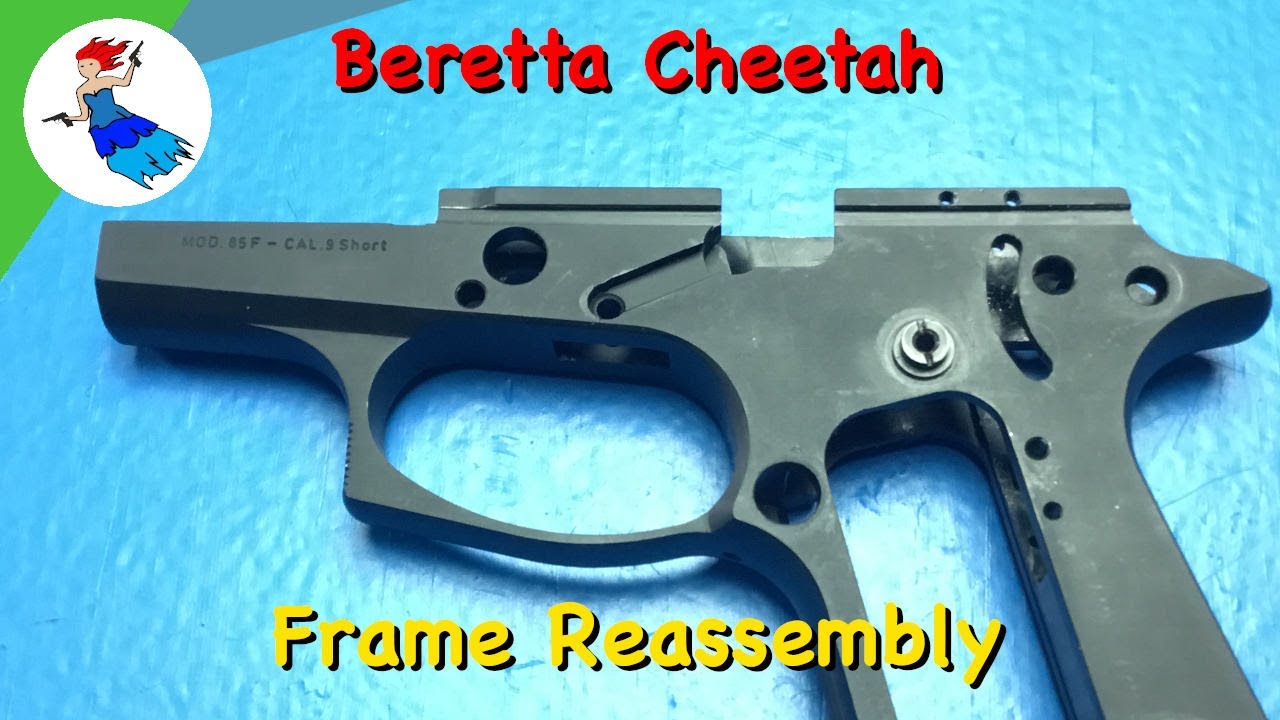
After you have completed repairs or replaced parts in your Beretta 80 Series pistol, you will need to put it back together. This video shows the complete frame reassembly for the Beretta 84FS Cheetah, Beretta 85 Cheetah, and Beretta 81. Even though the Beretta 84 and Beretta 85 are both Cheetah variants, there are a few differences between the two. This guide covers both models, and it also works for other classic firearms in the Cheetah family like the Beretta 81.
Video Summary
This walkthrough demonstrates a complete Beretta 80 Series frame reassembly in real time. The procedure starts with the magazine release and ejector installation, then moves through the hammer, sear, mainspring, trigger assembly, slide release, trigger bar, safety, and finishes with the disassembly latch and grip panels. Model-specific differences between the Beretta 84 and 85 are highlighted at each step. Watch the full video above if any step in the written guide feels unclear.
Video Chapters
| Section | Timestamp |
|---|---|
| Intro | 0:00 |
| Magazine Release | 0:15 |
| Ejector and Hammer Stop | 2:33 |
| Hammer | 8:06 |
| Sear | 8:53 |
| Mainspring | 10:59 |
| Trigger and Trigger Spring | 15:33 |
| Slide Release Lever | 18:41 |
| Trigger Bar | 20:17 |
| Safety | 24:19 |
| Disassembly Latch and Grips | 27:27 |
Inspector Checklist: Before You Start
Before you begin reassembly, verify the following:
- The frame is clean and free of debris.
- All replacement parts are the correct variant for your model (84 vs 85).
- The sear engagement surfaces are dry. Do not lubricate them.
- You have a clear workspace with good lighting.
- Wear safety glasses. Springs and pins are under tension and can launch.
Tools and Parts Checklist
| Item | Size / Spec | Purpose |
|---|---|---|
| Roll pin punch set | 1/16 inch, 3/32 inch, 1/8 inch | Install and align roll pins |
| Roll pin holder punch | 1/16 inch, 1/8 inch | Start roll pins without bending |
| Roll pin starter punch | 1/16 inch | Finish roll pin seating |
| Standard punch | 5/32 inch | Temporarily hold firing pin catch lever |
| Brass or polymer hammer | 2 to 3 lb | Drive pins without marring |
| Bench block | Steel or polymer | Support frame during pin work |
| Small screwdriver | Flat head | Trip sear during mainspring install |
| Dental pick or hook tool | Fine tip | Hook sear spring through mainspring housing |
| Paper clip | Standard | Align safety wing holes |
| White lithium grease | Spray or paste | Hold springs in place during install |
| Safety glasses | ANSI Z87.1+ | Eye protection |
Recommended Tools

Workbench Pick
Wiley X Rogue Safety Glasses
Best for: Eye protection at the bench and range. Close-fit design prevents fogging under shop lights.
TRB take: Eye protection is not optional on the bench. I use Wiley X Rogue because they sit close, do not fog, and handle the stray brass and debris from pin work without shifting.
Workbench Pick
Aegis Gun Care: Cleaner, Lube & Grease
Varies at Aegis Gun Care
Best for: Cleaning carbon from chambers, lubing rails, and protecting bore and internals between range sessions.
TRB take: Most AR problems blamed on parts are actually dry, dirty rifles. A quality cleaner and lube fixes more malfunctions than a parts bin. If the chamber looks like a coal mine and the carrier rails are dry, do not blame the magazine.
Step 1: Install the Beretta Cheetah 85 Magazine Release
Video Timestamp: 0:15
The first step to putting the Beretta 80 Series pistol back together is the magazine release. You will need four parts for this step: the magazine catch, the magazine catch spring plunger, the magazine catch spring, and the magazine catch roll pin.
Start by sliding the magazine catch spring onto the magazine catch plunger. It does not matter which side of the spring goes on first. Next, insert the magazine catch into the frame by placing its wing into the frame hole and rotating it into position. Let the catch fall slightly, then press down with your thumb to expose the plunger hole. Insert the plunger assembly spring-first into that hole, then rotate the catch back around so the plunger seats in the frame.
This next part is difficult to see on camera, but it is straightforward with the frame in hand. Look into the magwell and locate the roll pin hole. As you push the magazine release inward, the hole becomes unobstructed. Drop a 1/16 inch punch through that hole to hold everything in alignment. Use a 1/16 inch roll pin holder punch to start the roll pin, then finish the install with a 1/16 inch roll pin starter punch until the pin sits just below the surface on both sides. Test the catch to confirm it moves freely and does not bind.
Step 2: Install the Beretta Cheetah Ejector and Hammer Stop
Video Timestamp: 2:33
This is the hardest part of the reassembly. You must fit seven parts into the frame at once and temporarily hold them with a 1/16 inch punch and a 5/32 inch punch. The parts needed are the ejector, the hammer stop, the decock hammer spring, the firing pin catch lever, the firing pin catch lever spring, the rear roll pin, and the front straight pin.
Begin by installing the ejector. The blade of the ejector sits on the left-hand side of the frame. These can be tight, but they will fit with light pressure. Insert a 1/16 inch punch through the front hole of the ejector from left to right to hold it in place.
Next, apply a small amount of white lithium grease to the hammer stop. This helps hold the decock hammer spring in position during installation. Place the leg of the spring into the small hole in the hammer stop, with the coil aligned on the end. Move the punch slightly, then install the hammer stop onto the punch.
Install the firing pin catch lever spring next. The long leg faces upward. Slowly move the punch and slip the spring into position. Now install the firing pin catch lever onto a 5/32 inch punch. Before doing so, rotate the ejector up and make sure the hammer catch swings back around. Insert the 5/32 inch punch on the right-hand side of the frame where the hammer pin will eventually go. Install the firing pin catch lever with the bill facing forward and the tab facing the left-hand side of the frame. The bill will rest on your punch. Rotate the ejector back down. Maneuver the long leg of the spring around the tab so it sits on the back side.
With everything temporarily held, install the rear roll pin first using a 1/16 inch holder punch and a 1/16 inch roll pin punch. The pin is fully seated when it sits just below the surface on both sides. Then install the front straight pin (not a roll pin) using a holder punch and finish with a 1/16 inch punch, again just below the surface.
Step 3: Install the Beretta 84 and Beretta 85 Hammer
Video Timestamp: 8:06
For this step you need the hammer and the hammer pin. Install the hammer onto the 5/32 inch punch. If you pull the punch out too far, the firing pin catch lever may drop out. When that happens, remove the rear roll pin, reposition the firing pin catch lever inside the frame, and realign all the holes. You will probably get the hammer aligned first, which will stop the pin because the rear is not quite aligned yet. Once everything is aligned, give the hammer pin a light tap and it will seat fully.
Rotate the ejector down and reinstall the rear roll pin, making sure it is flush on both sides. If you had to reinstall the firing pin catch lever, do not forget to move the long leg of the spring back behind the tab.
Step 4: Install the Beretta Cheetah Sear
Video Timestamp: 8:53
You will need the sear, the sear pin, the sear spring, and the sear spring pin. Note: on the Beretta 85 there is no sear spring pin. Instead, the magazine disconnect pin takes its place later in the build.
Place the sear into the frame and temporarily hold it with a 3/32 inch punch inserted from below. Install the long leg of the sear spring down the back side of the sear, with the loop going onto the punch. Use a 3/32 inch holder punch to install the sear pin, then replace the punch with the pin and drive it until it sits just below the surface on both sides.
For the sear spring pin, use a 1/16 inch punch and a pick. Push the punch into the hole slightly, then reach up through the mainspring housing with the pick and hook the spring. Guide the spring onto the punch. If you are building a Beretta 84, install the sear spring pin now. On a Beretta 85, hold off on the magazine disconnect pin until later.
Step 5: Install the Beretta 84 and Beretta 85 Mainspring
Video Timestamp: 10:59
You need the hammer spring, the hammer spring guide, the hammer spring cap, and the hammer spring cap pin. Slide the hammer spring onto the hammer spring guide. Orientation does not matter. Insert a 5/32 inch punch into the bottom of the spring to act as a handle.
The trick is getting the ball end of the guide into the small slot on the back of the hammer. Apply a small amount of white lithium grease to hold the assembly together. Let the grease stiffen slightly, then insert the assembly up into the hammer spring hole in the bottom of the frame, with the bend facing toward the rear. You should see the head engage the bottom of the hammer.
Pull the punch out. The spring will try to follow. Cock the hammer to hold tension, then pull the spring off the punch with your fingers. It will fall back onto the guide. Now install the hammer spring cap. It is angled, so match that angle with the bottom of the frame. Because the hammer is cocked, the sear is holding it back, so the cap cannot seat fully. Trip the sear by inserting a small screwdriver into the sear notch from the left side, pull the sear back, and push the hammer up. The cap will now seat deeper.
Use a 3/32 inch punch to temporarily hold the cap while you align the holes. The 3/32 inch punch is used because it can twist and align the hole if the cap is rotated. Once aligned, install the 1/8 inch roll pin with a holder punch and finish with a 1/8 inch roll pin punch.
Step 6: Install the Beretta 84 and Beretta 85 Trigger and Trigger Spring
Video Timestamp: 15:33
You need the trigger, the trigger spring, and the takedown button. You will also need a 3/32 inch punch and a modified screwdriver (or small hook tool) for this step.
Insert the trigger into the frame and align the bottom hole of the trigger with the hole in the frame. Temporarily hold it with a 3/32 inch punch. Install the disassembly button on the right-hand side of the frame with the cutout facing upward. You will see the hole through the button faces upward as well.
The trigger spring is the hardest part of the entire reassembly. On the spring you have a hook and a long leg. The hook goes into the trigger groove. The loop goes onto the punch. The long leg goes into the hole of the disassembly button. Guide the long leg into the button hole first, then lay it down. Maneuver the small loop into the frame groove, then guide the spring into the trigger itself. This takes patience and a light touch. Once the spring is in the groove, pull the punch out slightly, push the spring down, and recapture it with the punch.
Step 7: Install the Beretta Cheetah Slide Release Lever
Video Timestamp: 18:41
You need the slide catch and the slide catch spring. The slide catch spring has a long leg and a short leg. Install it with the long leg facing outward and the short leg facing down, then rotate it around so the long leg seats into the notch on the frame.
Slowly replace the 3/32 inch punch with the slide catch, keeping the slide catch facing downward. Make sure the catch is in the groove, then lift it up while compressing the short leg into the frame. Be careful not to scratch the frame. The short leg should tuck into the frame cavity while the long leg stays in the notch.
Step 8: Install the Beretta Cheetah Trigger Bar
Video Timestamp: 20:17
You need the trigger bar and the trigger bar spring. If you have a Beretta 85, you also need the magazine safety, the magazine safety spring, and the magazine safety pin.
On the trigger bar there is a round peg and a square peg. The round peg goes into the top hole of the trigger. Rotate the bar around and you will see a hole where the dog-leg of the spring goes, and a slot where the hump of the spring rides. One problem: the trigger spring blocks the top hole. Use your modified screwdriver to hook the trigger spring and pull it out of the way.
Start the trigger bar install from below, inserting the round peg into the top trigger hole. It will not go all the way in because of the spring. Grab the spring with the screwdriver and guide it into the slot. To seat the bar fully, hook the spring with the screwdriver, pull it forward, slide the trigger bar in, and release. The trigger bar is now in place.
On the Beretta 85, install the magazine disconnect safety now. Lay it down so it catches the trigger bar. Replace the punch with the magazine disconnect pin. It helps if you can reach into the sear spring area with a screwdriver and pull upward to create clearance. Slide the pin into place. Install the magazine safety spring with the bent leg going into the notch, sliding it under and bending the spring up into position.
Step 9: Install the Beretta 84 and Beretta 85 Safety
Video Timestamp: 24:19
You need the trigger release lever, the right safety wing, the right safety pin, the left safety, the safety spring, and the safety plunger. In the front of the left safety there is a hole. Drop the safety spring into that hole, then insert the plunger onto the spring. The hammer must be cocked or the safety will not enter the frame.
Carefully insert the left safety into the frame. The plunger is only sitting on the spring, so move slowly. Use a 1/16 inch holder punch to compress the plunger and push it behind the hammer pin. Once the plunger is on the far side of the hammer pin, the left safety is fully installed.
Next, install the trigger release lever. Slide it into the frame and rotate it into position. Before installing the right safety wing, put the trigger release lever in place. Install the right wing, then use a paper clip inserted from the bottom to align the holes. Use a 1/16 inch roll pin holder punch to start the right safety pin, then finish with a 1/16 inch roll pin starter punch until the pin sits just below the surface on both sides.
Test the safety: with the safety on, decock the hammer. On a Beretta 85, the gun will not fire with the safety off unless you push up on the magazine disconnect safety. Verify the hammer cocks and the safety functions correctly in both positions.
Step 10: Install the Beretta Disassembly Latch and Grips
Video Timestamp: 27:27
You need the disassembly latch, left and right grip panels, four grip screw lock washers, and four grip screws.
Slide the disassembly latch into the frame hole and rotate it around. It will fall into place naturally. Push the button in and rotate it downward so the frame is ready to accept the slide.
Place the grip panel on the frame. If the grip screw lock washers fell out, reinstall them into the panel holes. Use a screwdriver to tighten the screws. Do not over-tighten. It is tempting to align the screw heads with the grip pattern, but over-tightening can crack or damage the grips. Tighten until snug and stop. Repeat on the other side.
Maintenance
After reassembly, apply a light film of CLP to the slide rails and the exterior metal surfaces. Wipe off any excess. Do not lubricate the sear engagement surfaces or the firing pin channel. Store the pistol in a dry environment with the hammer down.
Quick Troubleshooting
| Symptom | Cause | Fix |
|---|---|---|
| Magazine does not drop free | Magazine catch roll pin not flush | Drive pin until just below surface on both sides |
| Hammer does not cock | Firing pin catch lever spring misrouted | Remove rear pin, reroute spring behind tab |
| Trigger does not reset | Trigger spring loop not in groove | Remove slide catch, reinstall spring into trigger groove |
| Safety does not decock hammer | Plunger not behind hammer pin | Remove right wing, reposition plunger with holder punch |
| Grip screws loosen after shooting | Over-tightened and stripped | Replace lock washers, tighten to snug only |
Extended FAQ
Q: What is the correct order for reassembling a Beretta 80 Series frame?
A: The correct order is: (1) magazine release, (2) ejector and hammer stop, (3) hammer, (4) sear, (5) mainspring, (6) trigger and trigger spring, (7) slide release lever, (8) trigger bar, (9) safety, (10) disassembly latch and grips. Installing parts out of order makes subsequent steps impossible.
Q: What is the hardest part of Beretta 80 Series frame reassembly?
A: The ejector and hammer stop step is the most complex because seven parts must be held simultaneously with temporary punches. The trigger spring is the most difficult single component because it has three contact points under tension.
Q: Can I reassemble the frame without white lithium grease?
A: Yes, but it is much harder. The grease temporarily holds springs and small parts in place while you align pins. Without it, the decock hammer spring and mainspring assembly tend to fall apart before you can seat them. Use only a small amount and wipe off excess afterward.
Q: Why does my Beretta 85 not fire after reassembly?
A: On the Beretta 85, the magazine disconnect safety blocks firing unless a magazine is inserted or the disconnect is manually pushed up. This is normal. If the gun still does not fire with the safety off and a magazine inserted, check that the sear spring is properly seated and the hammer catch lever spring is routed behind the tab.
Q: How tight should the grip screws be?
A: Tighten until snug and no more. Over-tightening is the most common cause of cracked grip panels. The screws do not need to align with the grip pattern. If they loosen after shooting, replace the grip screw lock washers.
Q: What do I do if a roll pin bends during installation?
A: Remove the bent pin immediately. A bent roll pin will not seat flush and can damage the hole. Use a roll pin holder punch to start the next pin straight, and tap gently with a brass hammer. If the hole is damaged, stop and consult a gunsmith.
Q: How do I test the safety after reassembly?
A: With the safety on, the hammer should decock when you pull the trigger. With the safety off, the hammer should cock when you cycle the slide or pull the trigger (on the 85, only if the magazine disconnect is pushed up or a magazine is inserted). Verify both positions before loading ammunition.
Final Thoughts
The Beretta 80 Series frame reassembly is methodical but not difficult once you understand the order of operations. The most common mistakes are installing the magazine disconnect pin too early on an 85, forgetting to reroute the firing pin catch lever spring after reinstalling the hammer, and over-tightening the grip screws. Work over a bench block, wear safety glasses, and take your time with the trigger spring. The frame is now fully reassembled. The only remaining task is to install the slide, perform function testing, and verify safe firing operation.