- Quick Answer: How do you reassemble a Beretta 80 Series slide?
- Models Covered
- Models Not Covered
- This Guide Also Answers
- Video Walkthrough
- Video Summary
- Tools & Parts Checklist
- Recommended Tools
- Wiley X Rogue Safety Glasses
- Aegis Gun Care: Cleaner, Lube & Grease
- Real Avid Smart Mat Handgun
- Inspector Checklist: Read Before You Start
- Step 1: Firing Pin Assembly
- Step 2: Installing the Firing Pin and Firing Pin Block
- Step 3: Installing the Inner and Outer Retaining Pins
- 3A: Temporary Alignment Pin
- 3B: Outer Retaining Pin
- 3C: Inner Retaining Pin
- Step 4: Extractor Spring and Extractor Installation
- Step 5: Extractor Pin Installation
- Step 6: Slide Assembly Complete: Function Check
- Maintenance: Keep the Slide Running
- Quick Troubleshooting: Common Slide Reassembly Mistakes
- Extended FAQ
- What direction does the Beretta 80 Series outer retaining pin go?
- Which way should the Beretta Cheetah extractor claw face?
- Can I reuse Beretta 80 Series firing pin springs?
- Does this guide work for Beretta 80 Series FS models?
- Does this Beretta 80 Series slide assembly guide apply to the Beretta 80X?
- Why will the Beretta Cheetah firing pin block not line up?
- What do I do if the firing pin block will not slide into the channel?
- How do I know if the retaining pins are fully seated?
- What causes extractor problems after Beretta 80 Series slide reassembly?
- Why does my slide rattle after reassembly?
- Final Thoughts: Confidence Through Competence
Have you taken a Beretta 84 or 85 slide apart and hit a wall getting it back together? You are not alone. The Beretta Cheetah slide looks simple, but there are a couple of gotchas that stop people cold, especially the firing pin block and the inner/outer retaining pin sequence.
This guide walks you through the common Beretta 80 Series slide assembly steps shared across the Beretta 81, Beretta 82, Beretta 84, and Beretta 85 Cheetah family. The 82 is identical to the 84 except chambered in .32 ACP instead of .380 ACP, so the same slide steps apply. Most of the firing pin, retaining pin, and extractor steps apply across the older F and FS family, but some FS slides may include additional safety or decocker components depending on the variant. If your slide includes parts not shown here, verify your exact model before forcing anything. Note: This guide does not apply to the modern Beretta 80X (2023+). The 80X uses a different Browning-style locking block system, a barrel-mounted extractor, and a different takedown procedure.
Before you start, inspect every part. Make sure nothing is cracked, bent, or peened. A damaged firing pin or extractor claw will turn a simple reassembly into a range-day malfunction. Clean everything now. A deep clean is often what the slide needed in the first place.
Quick Answer: How do you reassemble a Beretta 80 Series slide?
To reassemble a Beretta 80 Series slide, install the firing pin and spring first, align the firing pin block with the firing pin cutout, use a temporary punch to hold alignment, install the outer and inner retaining pins, seat the extractor spring large-coil-first, install the extractor, then drive the extractor pin flush. Finish with a slide-only function check before reinstalling the slide on the frame.
Models Covered
- Beretta 81 Cheetah
- Beretta 82 Cheetah
- Beretta 84 Cheetah
- Beretta 84FS Cheetah
- Beretta 85 Cheetah
- Beretta 85FS Cheetah
Models Not Covered
- Beretta 80X Cheetah
This Guide Also Answers
- How to reassemble a Beretta 84FS slide
- How to reassemble a Beretta 85FS slide
- How to install the Beretta Cheetah firing pin block
- Which direction the Beretta 80 Series retaining pins go
- How to install the Beretta Cheetah extractor spring
- Why the Beretta 80 Series firing pin will not move freely
Video Walkthrough
Video Summary
This video walks through complete slide reassembly for the Beretta 80 series in real time. The walkthrough covers the initial parts layout and firing pin block orientation, installing the outer retaining pin from the right side using a roll pin punch and bench block, aligning and driving the inner retaining pin with a temporary alignment punch, seating the extractor spring with the large coil first and driving the extractor pin, and performing the final function check including the shake test, firing pin block movement, and extractor tension verification.
Watch the full walkthrough above if any step in the written guide feels unclear. The video shows the exact hand positions and tap sequences that prevent mushroomed pins and lost springs.
Safety Gate: Read Before You Touch Anything
- Ensure the pistol is unloaded. Remove the magazine and visually inspect the chamber.
- Work on a clean, well-lit bench. Small parts disappear on cluttered surfaces.
- Wear safety glasses. Roll pins and springs can launch under pressure.
- This guide covers slide assembly only. Frame and fire-control work is a separate procedure.
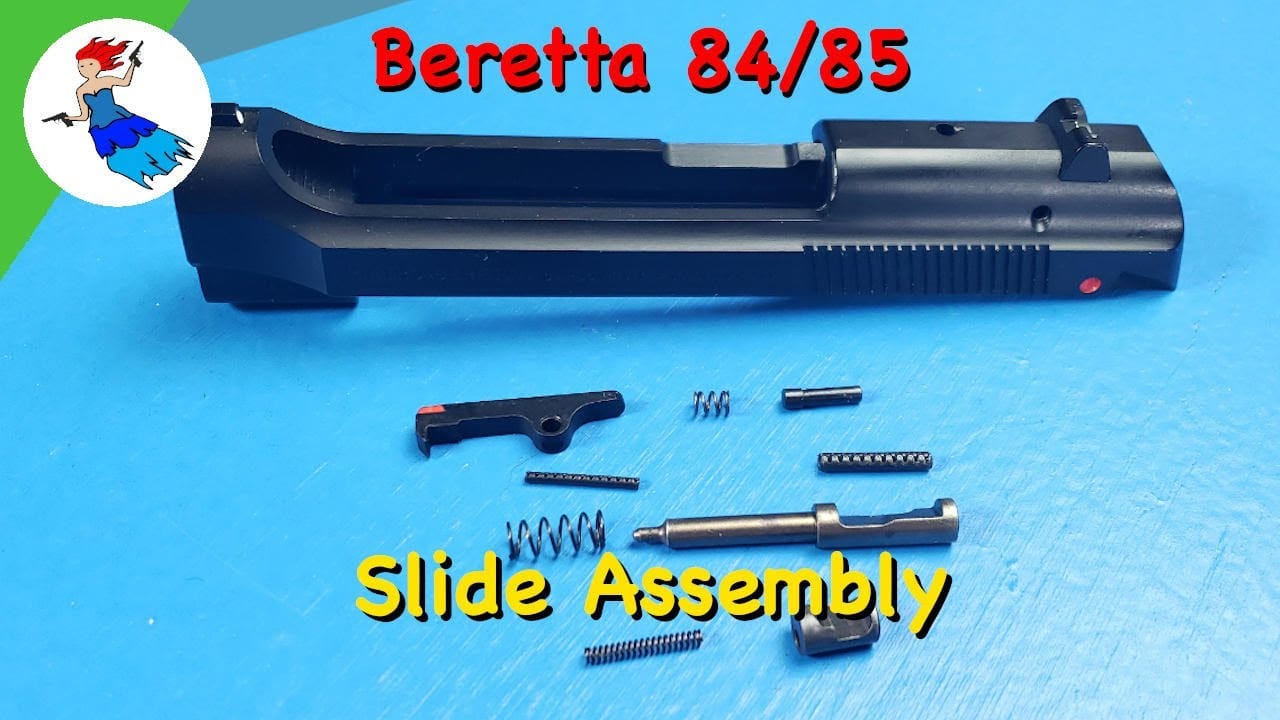
Tools & Parts Checklist
| Part / Tool | Used For | Notes |
|---|---|---|
| Firing pin | Strikes primer | Inspect tip for chipping or flattening |
| Firing pin spring | Returns firing pin forward | Either end goes on first. Not directional |
| Firing pin block | Drop safety | Groove faces the firing pin |
| Firing pin catch spring | Powers the block | Either end goes into the block. Not directional |
| Outer retaining pin (3/32-inch coiled spring pin) | Locks firing pin assembly | Installs from right side; sits just below surface when flush |
| Inner retaining pin (1/16-inch coiled spring pin) | Secondary lock | Finger groove faces opposite direction from outer pin groove |
| Extractor spring | Extractor tension | The larger coil goes into the slide recess first. If both coils look the same, either end goes in. |
| Extractor | Pulls spent case from chamber | Claw goes into breech face first |
| Extractor pin | Holds extractor in slide | Factory pins are straight; stepped aftermarket install narrow end first |
| 3/32-inch punch | Aligns firing pin / block | For temporary alignment pin |
| 3/32-inch roll pin punch (hollow-tip) | Installs outer retaining pin | Hollow tip clears pin ID. Never use a solid center punch to drive roll pins |
| 1/16-inch roll pin punch (hollow-tip) | Installs inner retaining pin | Same hollow-tip rule. Steel punches mushroom roll pin ends |
| 2-3 lb brass or plastic hammer | Seats roll pins | Steel hammers mushroom pin ends. Tap, do not pound. Check straightness after every few taps. |
| Roll pin holder punch (3/32 in) | Starts outer pin | Holds pin while you align it |
| Roll pin holder punch (1/16 in) | Starts inner pin | Holds pin while you align it |
| Plastic-head hammer | Seats extractor pin | Non-marring; prevents damage to pin head |
Recommended Tools

Workbench Pick
Wiley X Rogue Safety Glasses
Best for: Eye protection at the bench and range. Close-fit design prevents fogging under shop lights.
TRB take: Eye protection is not optional on the bench. I use Wiley X Rogue because they sit close, do not fog, and handle the stray brass and debris from pin work without shifting.
Workbench Pick
Aegis Gun Care: Cleaner, Lube & Grease
Varies at Aegis Gun Care
Best for: Cleaning carbon from chambers, lubing rails, and protecting bore and internals between range sessions.
TRB take: Most older blowback pistol problems blamed on ammo are really dirt, dry bearing surfaces, weak springs, or neglected extractor channels. A good cleaner and lube keeps the Beretta 80 Series running like it should.
Workbench Pick
Real Avid Smart Mat Handgun
Real Avid Gun Cleaning Mat for Handguns with Magnetic Organizer Parts Tray; Protective Workbench Mat for Pistol Cleaning,…
Inspector Checklist: Read Before You Start
Before you put anything back together, lay every part on a clean white towel and inspect it. Reassembling with a damaged part just means you will be back on the bench next weekend. Look for these specific problems:
- Firing pin tip: Should be centered and sharp, not off-axis from dry-firing or flattened from peening. Off-axis tips cause light strikes or misfires.
- Firing pin shank: Look for peening or galling where the retaining pins contact the shank. Peened metal can bind in the channel.
- Firing pin block slot edges: Should be clean and square. Rolled or mangled edges mean the block was beaten in from the wrong side during prior disassembly.
- Extractor claw: Should have a distinct, sharp hook. A rounded or polished-flat claw will slip off case rims and cause failures to extract.
- Slide breech face and firing pin hole: Look for peening, burrs, or cracks around the extractor pin hole and firing pin hole. A cracked breech face is a write-off. Stop and see a gunsmith.
- Pin holes in the slide: Should be round and clean. Egged (oval) holes mean pins were driven out from the wrong direction or hammered at an angle. Egged holes will not hold pins tight.
Pin Removal Direction: If you are taking this apart instead of assembling it, always drive pins out from left to right, the opposite of installation. The right side of the slide is the installation side. Driving a pin back through the same hole it entered can egg the hole and ruin the slide. Place the slide on a padded surface (wood block or rubber mat) before you strike anything.
Step 1: Firing Pin Assembly
Start with the firing pin and its spring. The spring slides onto the firing pin body. It does not matter which end of the spring goes on first. The spring is not directional. What matters is that the spring seats fully and does not bind on the pin shoulder.
Pro Tip: If the spring feels gritty or catches as you slide it on, stop. A gritty spring usually means debris in the firing pin channel. Wipe the pin with a clean cloth and run a pipe cleaner through the channel before proceeding. A dirty channel is the most common cause of light primer strikes in the 80 series.
Next, take the firing pin block and the firing pin catch spring. Drop the catch spring into the bottom recess of the block. Like the firing pin spring, this spring has no preferred orientation. The block is now ready to install.
Step 2: Installing the Firing Pin and Firing Pin Block
This is where most people get stuck. The firing pin and the block must be inserted together, and they must be aligned before any pin goes in.
Insert the firing pin:
- Hold the slide with the muzzle pointing away from you. Drop the firing pin in nose-first. The pointed end goes toward the muzzle. The flat end with the cutout stays toward you.
- Push the pin forward gently until you feel it stop. Look underneath the pin body. You will see a cutout (a notch or flat). That cutout must face upward, toward the top of the slide, where the firing pin block drops in.
- If the cutout is pointing sideways or down, rotate the firing pin slightly until the cutout faces up. If it does not face up, the block and pins will not align later.
Insert the firing pin block into its hole, spring-side first. The block installs with its pinned end (the end with the slot) facing downward toward the firing pin channel. The smooth, spring-loaded end goes in first. If the slot faces away from the firing pin, the retaining pins will not seat, and you will fight the assembly for ten minutes before realizing the block is backward. Double-check the orientation before you compress anything.
Warning: While compressing the firing pin block, never look directly into the firing pin channel from the rear. The spring can launch the block out with considerable force. Keep the slide oriented so the channel points away from your face, and keep your safety glasses on.
Compress both parts together. Use a punch to push in on the firing pin while pushing down on the firing pin block with your thumb or a second tool. Both the firing pin and the block must be fully seated and flush before the retaining pins can enter.
Call a Pro: If the firing pin tip is chipped, cracked, or bent, or if the firing pin channel in the slide is peened or gouged, stop. A damaged firing pin can cause pierced primers or out-of-battery discharge. Replace the firing pin or have the slide inspected by a qualified gunsmith before reassembly.
Step 3: Installing the Inner and Outer Retaining Pins
This is the trickiest part of the entire job. You are holding three things in alignment at once: the firing pin, the block, and a temporary alignment punch while you drive in a roll pin. Take your time. Rushing this step is how roll pins get bent, lost, or driven into the slide at an angle. Place the slide on a gunsmith bench block to keep it stable and protect the rails while you drive the pins.
3A: Temporary Alignment Pin
Insert a 3/32-inch punch into the firing pin retaining pin hole on the right-hand side of the slide. This is your temporary alignment tool. It is not the final pin; it is just holding everything in place while you prepare the outer retaining pin.
Now, with one hand holding the punch in place, push in on the firing pin block, then push in on the firing pin, and then push in on the punch itself. All three must compress simultaneously.
Use a screwdriver blade or a second punch to push the firing pin inward while your thumb holds the block down. Then push the alignment punch inward. You will feel the punch rotate the firing pin slightly. That rotation happens because the punch pushes against one side of the firing pin cutout, which turns the pin until the cutout aligns with the punch path. This is exactly what should happen. The rotation is how you know the firing pin is finding its home. It may not go all the way through on the first try. Push the punch a little farther, and it should drop fully into the hole.
Pro Tip: If the alignment punch will not go all the way through, the firing pin is not rotated into its locked orientation. Pull the punch out slightly, wiggle the firing pin until the notch aligns with the punch path, and try again. Do not hammer the alignment punch. It is a temporary tool and will deform if you strike it.
3B: Outer Retaining Pin
With the alignment punch holding everything in place, install the outer firing pin retaining pin. Use a 3/32-inch roll pin holder punch to start the pin. The holder punch grips the pin and lets you align it with the hole without dropping it into the slide recess.
Drive the outer pin in just far enough to hold the firing pin, about halfway. Once it is started, remove the temporary alignment punch. The outer pin is now doing the holding.
Switch to a 3/32-inch hollow-tip roll pin punch, not the holder punch, and finish driving the outer pin. The pin is fully seated when it sits just below the surface of the slide. It should not protrude, and it should not be countersunk too deeply. Just below flush is correct. Pins driven too deep can cut into the firing pin channel and bind the assembly. If you feel the pin stop hard before flush, do not force it. Check alignment first.
3C: Inner Retaining Pin
The inner firing pin retaining pin is smaller and installs in the same general area, but it has a specific orientation requirement: the finger groove on the inner pin must face the opposite direction from the finger groove on the outer pin. Opposite-facing grooves prevent them from aligning into a continuous channel that could allow pin walk or reduced retention, and gives both pins full bearing surface in the slide.
Pro Tip: Some armorers prefer to install the inner pin first, because it locks the firing pin block in place before the outer pin is driven. This makes alignment easier for beginners. The outer-first sequence used in this guide is the traditional method and works fine with practice, but if you are struggling, try inner pin first. The finger groove orientation rule still applies either way.
Use a 1/16-inch roll pin holder punch to start the inner pin. Switch to a 1/16-inch roll pin punch to finish the install. When both pins are fully seated, they should be flush with each other. If one sits proud, tap it in gently. If one is too deep, the pin may be damaged. Pull it and inspect before continuing.
Pro Tip: If you do not have roll pin holder punches, a pair of needle-nose pliers with smooth jaws can hold the pin while you start it. Cover the slide with a shop rag so that if the pin slips, it does not bounce off the bench and into the carpet. These pins are small enough to vanish forever.
Step 4: Extractor Spring and Extractor Installation
Turn the slide over so the right-hand side faces up, with the muzzle pointing away from you. The extractor area is the large hole just forward of the retaining pins, closer to the muzzle end. The extractor spring drops into that hole. The spring has a larger coil at one end. The larger coil should go into the slide recess first for the best retention. If both coils look the same diameter, either end goes in first.
Set the spring into the hole and make sure it seats fully. A partially seated spring will let the extractor wobble and cause inconsistent extraction.
Now take the extractor. The claw goes into the front of the breech face first. Hook the claw over the breech face edge, then lay the body of the extractor down into its slot. The extractor should sit flat and move freely in the slot. If it binds, check for burrs on the extractor or debris in the slot.
Step 5: Extractor Pin Installation
The extractor pin holds the extractor in the slide. Factory Beretta extractor pins are straight cylindrical roll pins. If you are using an aftermarket stepped pin (narrow at one end, wider at the other), install the narrow end first. Insert the pin from the top of the slide.
While holding the extractor in place with one finger, align the pin with the hole in the extractor body and push it in by hand as far as it will go. The pin should slide in smoothly if the holes are aligned.
Once the pin is hand-started, use a plastic-head hammer to finish the install. Tap gently. The pin should walk in straight. A steel hammer will mushroom the pin head and make future disassembly a nightmare. The pin is fully seated when it is flush with the slide surface.
Pro Tip: If the extractor pin will not start by hand, the holes are not aligned. Push inward on the extractor body with your thumb while threading the pin. Do not force the pin with the hammer. A bent or cross-started roll pin can jam and damage the slide hole.
Step 6: Slide Assembly Complete: Function Check
The slide is now fully assembled. Before you mate it to the frame, run a quick function check on the slide alone:
- Shake the slide gently. Nothing should rattle. If you hear a loose pin or spring, disassemble and re-check seating.
- Press the firing pin block with your thumb. It should move freely against its spring and return when released.
- Look through the firing pin hole from the rear. The firing pin tip should be visible and centered.
- Move the extractor claw in and out. It should spring back under extractor spring tension.
If everything checks out, the slide is ready to go back onto the frame. If any step feels wrong, stop. It is easier to fix a misaligned pin on the bench than it is to diagnose a failure-to-fire at the range.
Maintenance: Keep the Slide Running
As you can see, there are not many parts in these slides. That simplicity is what makes the Cheetah reliable. But simplicity still needs maintenance. A dirty firing pin channel, a weak extractor spring, or a clogged extractor recess will cause malfunctions that look like ammunition problems but are actually cleanliness problems. A quality cleaner and lube from Aegis Gun Care keeps the slide running smoothly between cleanings.
| Interval | What to Inspect | What to Replace | Notes |
|---|---|---|---|
| Every range session | Extractor claw, breech face debris | Nothing; clean only | A quick wipe prevents buildup |
| Every 1,000 rounds | Firing pin channel, extractor spring tension | Extractor spring if weak | Weak springs cause stovepipes and light strikes |
| Every 5,000 rounds | Firing pin tip, retaining pin tightness, extractor claw edge | Firing pin if chipped; extractor if claw is rounded | Parts wear gradually. Inspect before they fail |
Pro Tip: If your Cheetah starts having failure-to-extract or stovepipe malfunctions after running reliably for years, do not blame the ammo first. Pull the slide, check the extractor spring tension, and look at the extractor claw edge. A rounded claw or a tired spring will cause extraction problems that look like ammunition issues but are actually wear problems. The fix is a $5 spring and ten minutes on the bench.
Quick Troubleshooting: Common Slide Reassembly Mistakes
| Problem | Likely Cause | Fix |
|---|---|---|
| Retaining pins will not go in | Firing pin block is backward or firing pin is not rotated | Remove block, re-check groove orientation and firing pin cutout alignment |
| Firing pin does not move freely | Outer pin driven too deep; pin is binding on firing pin | Remove pin, check depth, re-install to just-below-flush |
| Extractor wobbles or falls out | Extractor spring not seated; pin not fully driven | Remove extractor, re-seat spring fully, re-install pin |
| Extractor pin bends during install | Holes misaligned; pin started at an angle | Align extractor by hand first, start pin straight, use plastic hammer only |
| Slide rattles after assembly | Inner or outer pin is loose; spring not fully compressed | Shake test each component; re-seat loose parts |
Extended FAQ
What direction does the Beretta 80 Series outer retaining pin go?
The outer retaining pin installs from the right side with the groove facing away from the inner pin groove. The two grooves face opposite directions so the firing pin block can ride between them. If both grooves face the same direction, the block will not function correctly.
Which way should the Beretta Cheetah extractor claw face?
The extractor claw faces rearward, toward the breech face. It hooks the rim of the cartridge case to pull it from the chamber during cycling. If installed backward, the slide will not extract spent cases.
Can I reuse Beretta 80 Series firing pin springs?
Yes, if the spring shows no compression set, rust, or damage. Test by compressing it in your hand. If it feels weak or is shorter than a new spring, replace it. Firing pin springs are inexpensive insurance against light strikes.
Does this guide work for Beretta 80 Series FS models?
Most of the firing pin, retaining pin, and extractor steps apply across the older Beretta 80 Series family. Some FS slides include additional safety or decocker parts depending on the variant. If your slide includes extra parts not shown here, consult the factory manual or a qualified gunsmith before continuing.
Does this Beretta 80 Series slide assembly guide apply to the Beretta 80X?
No. This guide applies to the older Beretta 80 Series Cheetah pistols, including the 81, 82, 84, and 85. It does not apply to the modern Beretta 80X, which uses a different system and different takedown procedure.
Why will the Beretta Cheetah firing pin block not line up?
The firing pin block usually will not line up because the firing pin cutout is not rotated upward, the block is backward, or the temporary alignment punch is not compressing the firing pin and block together. Stop and re-check the firing pin cutout before driving any retaining pin.
What do I do if the firing pin block will not slide into the channel?
Check that the firing pin catch spring is seated correctly inside the block. Also verify the firing pin spring is fully seated in the rear channel. If the block still binds, inspect the channel for burrs or carbon buildup and clean it before trying again.
How do I know if the retaining pins are fully seated?
Both the inner and outer retaining pins should sit just below the surface on both sides of the slide. They should not protrude. Run a fingernail across the pin heads. If you feel a bump, tap the pin gently until it sits just below flush.
What causes extractor problems after Beretta 80 Series slide reassembly?
Extractor problems usually come from a weak extractor spring, a spring that is not fully seated, an extractor pin started at an angle, or an extractor claw that is worn or rounded. Re-check spring seating, extractor movement, and pin alignment before blaming the ammunition.
Why does my slide rattle after reassembly?
A loose extractor or incorrectly seated retaining pins can cause rattling. Check that the extractor pin is fully driven and the extractor spring is properly compressed. Also verify the firing pin block moves freely but is not loose in the channel.
Final Thoughts: Confidence Through Competence
The Beretta 80 series slide looks intimidating when it is in pieces on the bench, but the assembly is straightforward once you know the sequence. There are a handful of parts, two roll pins, and one tricky alignment step. The sequence is simple: firing pin, block, temporary punch, outer pin, inner pin, extractor spring, extractor, extractor pin. The whole job takes under ten minutes.
What separates a smooth reassembly from a frustrating afternoon is knowing the gotchas before you hit them. The firing pin block orientation. The three-thing alignment for the retaining pins. The extractor pin direction. These are the details that matter.
Clean your slide. Inspect your parts. Replace springs before they go soft. And when you do need to take it apart, follow the order. The Cheetah has been running for decades because the design is simple, not because it is magic. Simple systems still need attention. Give them that attention, and they will keep running.
You do not need to be an armorer to keep your Beretta Cheetah running. You just need the right sequence and the patience to follow it.