Your AK Just Stopped Running. Here Is How to Bring It Back.
It ran fine for 500 rounds, then it stopped extracting. Or it fed fine yesterday and today every magazine nosedives. The AK platform is famous for running dirty, but when it stops, it stops hard. This guide walks you through every common AK/AKM problem the same way a Chilton manual walks you through a truck that will not start: Symptom ➔ Diagnosis ➔ Fix.
This guide focuses on common AK and AKM-pattern troubleshooting. Many rifles share the same basic long-stroke piston operating concept, but parts compatibility, magazines, headspace gauges, receiver styles, and service limits vary widely by model, country of origin, and manufacturer. Use this guide as a diagnostic workflow, then confirm measurements and replacement parts against your exact rifle and its documentation.
Quick Reference Card: At-a-Glance Diagnostics
Bookmark this. When your AK acts up, start here. Click the symptom to jump to the full workflow.
Quick Diagnosis Table
| Symptom | Most Likely Cause | Quick Fix | Severity | Start Here |
|---|---|---|---|---|
| Failure to extract (stuck case) | Dirty chamber; worn extractor; weak spring | Clean chamber; inspect extractor hook | Bench Fix | Failure to Extract |
| Failure to feed (nosedive) | Magazine feed lips; weak spring; over-insertion | Replace mag; check bullet guide | Range Fix / Bench Fix | Failure to Feed |
| Light primer strikes | Dirty firing pin channel; weak mainspring | Detail clean bolt; test spring tension | Range Fix / Bench Fix | Light Primer Strikes |
| Runaway fire (hammer follow) | Worn disconnector; cracked sear | STOP FIRING; inspect FCG | Stop Firing | Runaway Fire |
| Double feed | Over-inserted mag; weak recoil spring | Hold bolt rearward while removing mag; clear chamber | Range Fix / Bench Fix | Double Feed |
| Stovepipe (failure to eject) | Weak recoil spring; fouled bolt; loose ejector | Replace spring; clean bolt face | Bench Fix | Stovepipe |
| Out-of-battery discharge | Dirty bolt face; worn lugs; headspace creep | Detail strip; check headspace | Stop Firing | Out-of-Battery |
| Safety binds or slips | Worn spring tension; receiver burrs; lever geometry | Inspect selector tension; smooth burrs; replace lever if worn | Bench Fix | Safety Lever Issues |
| Short stroking | Clogged gas port; cracked gas tube; bent piston | Clean gas port; inspect gas tube | Bench Fix | Short Stroking |
| Magazine won’t seat | Worn mag catch; deformed receiver dimples | Replace catch; test with known-good mags | Range Fix / Bench Fix | Magazine Seating |
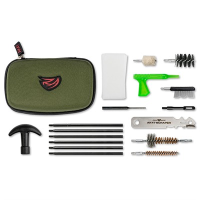
Tools Required
| Tool | Why You Need It | Recommended |
|---|---|---|
| Chamber brush (7.62×39 or 5.45×39) | Removes baked carbon from chamber walls | BoreTech or Hoppe’s chamber brush |
| Headspace gauges (Go/No-Go) | Safety check after bolt or barrel work | Forster or Clymer 7.62×39 set |
| Pin punch set (metric 2-5 mm) | Detail strip: extractor, firing pin, FCG pins | Wheeler or Grace USA brass punches |
| Bronze bore brush + patches | Field cleaning after range sessions | Otis or Breakthrough kit |
| CLP or gun oil (not for gas system) | Bolt rails, FCG pins, safety detent | BreakFree CLP, Slip 2000 EWL |
| Brass hammer | Stuck pins, mag catch drift, front sight | 12-16 oz brass head |
Pro Tip: Carry a spare extractor, extractor spring, and firing pin in your range bag. All three fit in a 35mm film canister. AK parts fail at the worst possible time. A small parts kit can save your whole shooting day. Cost varies by brand and source.
Safety First: Before You Touch Anything
If your rifle misbehaved at the range, verify the following before opening the action or touching tools.
☐ CHECK 1: Remove the magazine. Press the magazine release and withdraw the magazine completely.
☐ CHECK 2: Pull the charging handle fully rearward and visually inspect the chamber. Most standard AK-pattern rifles do not lock open automatically. If your rifle has a bolt-hold-open notch, use it. If it does not, manually control the charging handle while inspecting the chamber.
☐ CHECK 3: Visually and physically inspect the chamber. Look into the ejection port. Insert a finger if lighting is poor. Verify no round is present.
☐ CHECK 4: Point the muzzle in a safe direction at all times during the following steps.
Some failures in this guide are safety-critical: runaway fire, out-of-battery discharge, and case head separation. If you experienced any of those, do not attempt to fire the rifle again until all three steps of the relevant workflow are complete.
A Word on AK Variants
CHAMBER / COMPATIBILITY WARNING: AK-pattern rifles cover several calibers and receiver types. Most of this guide addresses 7.62x39mm stamped-receiver AKMs (WASR, NPAP, PSAK). If you own a milled receiver (SAM7), a 5.45×39 variant (AK-74), or a Yugo pattern (NPAP/OPAP with different mag wells), some specifics differ.
- 7.62×39: WASR, PSAK, VSKA, GP WASR-10, Riley Defense
- 5.45×39: AK-74, AKS-74. Use 5.45 chamber brush and different headspace gauges
- Yugo / Zastava: NPAP, OPAP. Magazine wells differ; many standard AK mags fit tight or require modification
- Milled receivers: Arsenal SAM7, original Type 1-3. Theoretically stronger, but parts are not interchangeable with stamped receivers
- Budget or commercial builds: On rifles with unknown build quality, inspect front trunnion rivets, locking lugs, receiver fit, and headspace more frequently. Assembly quality and heat treatment matter more than the logo on the side.
Pro Tip: When ordering parts, specify your exact model. “AK-47” is a catch-all in media. For parts compatibility, “AKM” or your specific import name matters more.
What Is Wrong With Your AK?
Follow the decision tree below. Click the failure mode that matches what you saw.
- Round fired but casing stayed in the chamber? ➔ Failure to Extract
- Round nose-dived into the feed ramp or got stuck half-fed? ➔ Failure to Feed
- Click. No bang. Ejected round shows a shallow primer dent? ➔ Light Primer Strikes
- Rifle fired more than one round per trigger pull? ➔ Runaway Fire (STOP)
- Two rounds jammed in the chamber at once? ➔ Double Feed
- Spent case standing vertically in the ejection port? ➔ Stovepipe
- Bang but bolt not fully closed? Bulged case or gas in your face? ➔ Out-of-Battery Discharge
- Safety hard to move, slips out of position, or will not engage? ➔ Safety Lever Issues
- Bolt does not move back far enough to eject or feed? ➔ Short Stroking
- Magazine rocks in but will not lock or wobbles loose? ➔ Magazine Won’t Seat
Before You Start: Diagnostic Rules
Changing one variable at a time keeps you from chasing ghosts. Follow this order before replacing parts.
- Test with a known-good magazine. A different magazine fixes more “rifle” problems than any other single test.
- Test with known-good ammunition. Brass-cased factory ammo eliminates ammo variables quickly.
- Clean the chamber, bolt face, and gas system. Carbon build-up is the most common AK malfunction cause.
- Inspect springs and wear parts. Worn springs and rounded extractors are consumables, not defects.
- Check safety-critical items: headspace, rivets, and locking lugs. These cannot be ignored or patched.
- Stop firing if pressure signs, runaway fire, or out-of-battery symptoms appear. Safety always overrides curiosity.
Failure to Extract: The Case Is Stuck in the Chamber
What it looks like: You fire a round. The bolt barely moves or cycles partway, and the spent casing stays wedged in the chamber. On a semi-auto, the bolt may slam forward again without picking up a new round. On manual inspection, the extractor hook is sitting above the case rim instead of hooked under it.
Why it happens: Three things cause stuck cases. First, carbon and lacquer build up in the chamber, increasing friction so the case cannot slide out. Second, the extractor hook rounds off after thousands of rounds and loses its grip on the case rim. Third, a weak or cracked extractor spring does not press the hook down hard enough to grab the rim at all. Steel-cased ammo accelerates all three because it does not expand and seal the chamber like brass, leaving more carbon blowby behind.
Step 1: Field Check (30 seconds)
Goal: Confirm the problem with zero tools in about 30 seconds.
Tools: None.
- CHECK: Remove the magazine. If your rifle has a bolt-hold-open notch or magazine follower system, lock it open. Otherwise, pull the charging handle fully rearward and manually hold the action open while inspecting. Shine a light into the chamber. Is the wall black with carbon or green with corrosion?
- CHECK: With the bolt carrier removed, look at the extractor hook. Does it still show a sharp, square corner where it grips the rim? Or is it rounded like a spoon?
- CHECK: Compress the extractor spring with a fingernail. Does it return instantly with firm tension? Or does it collapse weakly?
Fixed? Yes ➔ If the chamber was dirty and cleaning frees the stuck case, you are done. Load and test with three rounds.
No ➔ Continue to Step 2.
Step 2: Range Diagnosis (2 minutes)
Goal: Isolate ammunition brand, magazine, and extraction conditions before bench disassembly.
Tools: Known-good magazines, known-good brass-cased ammo, dirty/surplus ammo for comparison.
- TEST: Load known-good brass-cased ammunition. Brass-cased ammunition usually seals and contracts better than steel-cased ammunition. If brass extracts reliably but steel sticks, suspect chamber fouling, ammo coating or carbon buildup, or a tight or rough chamber.
- TEST: Switch to a known-good magazine from a different manufacturer. If the original mag fails and a known-good magazine runs fine, the feed lips or follower are causing extraction inconsistency.
- TEST: Run five rounds one at a time. Does failure-to-extract appear after the rifle heats up? If yes, heat expansion and carbon buildup are the likely culprits.
- TEST: Inspect ejected brass. If brass is deeply scratched or torn on one side, the extractor hook is biting unevenly.
Fixed? Yes ➔ Ammunition or magazine isolation resolved the issue. Adjust maintenance or magazine selection.
Not Fixed ➔ Headspace, chamber roughness, or extractor wear is involved. Proceed to Step 3.
Step 3: Workbench Fix (Tools required)
Goal: Replace worn parts and restore correct chamber geometry.
Tools Needed: Chamber brush, solvent, bronze bore brush, replacement extractor, replacement extractor spring, pin punch (to drift extractor pin out of bolt).
- Drift out the extractor retaining pin from the bolt head. Remove the extractor and spring.
- Install a new extractor and spring as a matched set. Pin should seat flush with the bolt body.
- Scrub the chamber with a bronze brush and solvent until patches come out clean. For baked-on lacquer from steel-case ammo, use brake parts cleaner (non-chlorinated) and a bronze brush.
- Clean the bolt face and recess deeply. Carbon here prevents the extractor from seating fully against the case head.
- Function-check: Insert a round into the bolt face manually. The extractor should snap over the rim with audible tension. Tilt the bolt downward; the round should not fall free.
- Reassemble, load three rounds, and test fire.
Workbench Pick
Real Avid Gun Boss AK-47 Cleaning Kit
$39.99 at Brownells
Complete AK cleaning kit with chamber brush, rods, and patches for carbon removal and maintenance.
Check Price at Brownells
Workbench Pick
Tactical Springs AK Extractor Spring Kit
$21.99 at Tactical Springs LLC
Extractor spring kit for AK bolt assemblies. Cures failure-to-extract, stovepipes, and inconsistent ejection.
Check Price at Tactical SpringsReference Table: Failure to Extract
| Symptom | Likely Cause | How to Confirm | Fix | Skill Level |
|---|---|---|---|---|
| Stuck case after firing | Dirty chamber | Black/green chamber walls; patches dirty | Chamber brush + solvent until clean | Beginner |
| Stuck case after firing | Rounded extractor hook | Hook looks spoon-shaped; skates off rim | Replace extractor + spring | Intermediate |
| Stuck case after firing | Weak extractor spring | Spring collapses under finger pressure | Replace extractor spring | Beginner |
| Stuck case only with steel ammo | Chamber carbon + tight tolerances | Brass works fine; steel sticks | Aggressive chamber cleaning; consider brass | Beginner |
Pro Tip: Chrome-lined AK chambers resist buildup better than bare steel, but carbon still accumulates if you run steel-case ammo. When shooting steel-cased ammunition heavily, inspect and clean the chamber more often. A 200 to 300 round interval is a conservative starting point, not a universal rule. A chamber mop soaked in solvent between range trips pays for itself in reliability.
Call a Pro: If the bolt face shows cracks, the locking lugs are chipped, or the extractor cutout in the bolt is wallowed out, stop. The bolt is a safety-critical part under extreme pressure. A cracked bolt can rupture on the next shot. Replace the bolt and check headspace with Go/No-Go gauges before firing again.
Failure to Feed: The Round Nose-Dives or Hangs on the Ramp
What it looks like: The bolt strips a round from the magazine, but the bullet dives nose-down against the barrel hood or bullet guide instead of sliding into the chamber. The bolt may stall partway forward, or the round may jam at a 45-degree angle in the receiver.
Why it happens: Feed geometry depends on the magazine presenting the round at the correct angle at the correct height. If feed lips are bent, spread, or cracked, the round points too low. If the magazine spring is weak, the round pops up late and low. If the bullet guide on the receiver is damaged or misaligned from a poor build, even good magazines cannot feed correctly. Over-insertion can also push the magazine too high, causing the bolt to ride over the round entirely.
Step 1: Field Check (30 seconds)
Goal: Identify magazine vs. rifle in 30 seconds.
Tools: None.
- CHECK: Try three different magazines from different manufacturers. If only one magazine fails, the mag is the problem.
- CHECK: Look at the feed lips of the failing magazine. Hold it up to the light. Do the lips spread outward, or show cracks at the top?
- CHECK: Push the follower down with your thumb. Does it return to the top crisply, or does it drag and move slowly?
Fixed? Yes ➔ Known-good magazine feeds perfectly. Discard or rebuild the bad magazine.
No ➔ Continue to Step 2.
Step 2: Range Diagnosis (2 minutes)
Goal: Isolate magazine, ammunition, and feeding conditions with controlled live-fire or dummy-round confirmation.
Tools: Known-good magazines (three from different makers), known-good brass-cased ammo, dummy rounds.
- TEST: Load three known-good magazines with known-good brass ammo. Fire one round per mag. Does the round chamber cleanly from every mag? If one magazine fails consistently, the mag – its feed lips, spring, or follower – is the problem.
- TEST: If all known-good magazines fail, the problem is the rifle. Confirm by loading one round in a mag, inserting slowly, and manually cycling the action to observe feed angle with dummy rounds.
- TEST: Compare steel-cased vs brass-cased ammo of the same bullet weight. If steel nosedives and brass feeds fine, the problem is ammunition-driven, not rifle-driven.
- TEST: Observe whether the failure happens immediately after insertion, mid-magazine, or on the last round. Immediate-insertion failures suggest mag catch geometry; mid-magazine failures suggest follower tilt; last-round failures often point to worn worn followers or weak magazine springs.
Fixed? Yes ➔ Ammunition or magazine isolation resolved the issue. Adjust magazine selection or ammo type.
Not Fixed ➔ Feed ramp angle, short-stroking, or receiver geometry is involved. Proceed to Step 3.
Step 3: Workbench Fix (Tools required)
Goal: Correct mechanical feed geometry.
Tools Needed: Needle-nose pliers (for minor feed-lip tuning), replacement magazines, possible gunsmith for bullet guide.
- Replace the suspect magazine if lips are bent or spring is weak. Feed-lip tuning with pliers is possible but requires experience; replacement is usually cheaper than frustration.
- Inspect the bullet guide. Minor burrs can be polished with fine sandpaper. If the guide is fundamentally misaligned or damaged, it needs welding and reshaping by a gunsmith.
- Check magazine catch engagement. With the magazine locked in, try to rock it fore and aft. There should be minimal play. Excessive wobble means the catch is worn or the front lug is out of spec.
- Function-test with dummy rounds. Feed three dummy rounds through the rifle manually, cycling by hand. Each should chamber smoothly without binding or tilting.
Workbench Pick
Magpul PMAG AK/AKM Gen M3 7.62x39mm 30-Round Magazine
$24.99 at Brownells
Reliable AK magazine for troubleshooting failure-to-feed, seating, and double-feed issues.
Check Price at BrownellsReference Table: Failure to Feed
| Symptom | Likely Cause | How to Confirm | Fix | Skill Level |
|---|---|---|---|---|
| Nose-dive into barrel hood | Bent/spread feed lips | Hold mag to light; lips splay apart | Replace magazine | Beginner |
| Nose-dive into barrel hood | Weak magazine spring | Follower returns sluggishly | Replace mag spring or entire magazine | Beginner |
| Nose-dive into barrel hood | Damaged bullet guide | Guide bent, cracked, or missing edge | Gunsmith repair or replacement | Pro |
| Bolt rides over round | Over-insertion | Problem disappears with bolt-back insertion | Hold bolt rearward; seat magazine firmly | Beginner |
| Feed only on last round | Worn follower | Follower tilts or binds at top of mag | Replace magazine | Beginner |
Pro Tip: Surplus magazines are cheap because they are worn out. A “good deal” on ten used mags is not a deal if half of them fail to feed. Test every magazine with at least 30 rounds before trusting it for defense or competition. Quality current-production PMAG AK and US Palm mags often outperform vintage surplus.
Call a Pro: If the bullet guide is damaged, the receiver front trunnion is cracked, or multiple high-quality magazines all fail to feed the same rifle, the problem is receiver geometry. Re-welding or correcting a misaligned front trunnion is not a home-project fix. Take the rifle to an AK-specific gunsmith.
Light Primer Strikes: Click, No Bang
What it looks like: You pull the trigger. The hammer falls with an audible click. The round does not fire. When you eject the round, you see a shallow dimple in the primer instead of a deep, centered strike.
Why it happens: Light strikes on AKs come from four places. First, the firing pin channel collects grease, oil, and carbon sludge that slows the pin’s forward travel. Second, a weak mainspring (hammer spring) does not generate enough energy to drive the firing pin fully home. Third, a worn or bent firing pin may protrude less than typical reference values. Many AKM-pattern references place firing pin protrusion around 0.028 to 0.035 inches, but this varies by manufacturer, bolt design, and caliber. Confirm against your rifle’s documentation or a known-good bolt before treating any number as a hard limit. Fourth, some surplus ammunition has deeply seated primers that require more force than a weakened system can deliver.
Step 1: Field Check (30 seconds)
Goal: Confirm if the issue is ammo-specific or rifle-specific.
Tools: None.
- CHECK: Did the light strike happen with only one brand or lot of ammunition? Or does it happen with everything including factory brass?
- CHECK: Remove the bolt carrier. Shake the bolt and listen. Does the firing pin rattle freely, or does it sound sticky?
- CHECK: Manually cock the hammer with the top cover off. Release it against the firing pin tail. Does it snap forward crisply, or does it feel sluggish and soft?
Fixed? Yes ➔ If the problem happened only with one lot of surplus ammo, switch ammunition brands and retest. Some Eastern Bloc surplus has deeply seated primers.
No ➔ Continue to Step 2.
Step 2: Range Diagnosis (2 minutes)
Goal: Isolate ammunition type and firing behavior before disassembling the bolt or checking pin protrusion.
Tools: Known-good factory brass ammo, known-good steel-cased ammo from a different lot, dummy rounds.
- TEST: Fire five rounds of different ammunition lots. Did light strikes follow a specific brand or lot? If yes, deeply seated primers or hard primers in that lot are the cause, not the rifle.
- TEST: Test commercial brass-cased ammo against surplus steel-cased. Commercial primers are generally softer and seat easier. If light strikes disappear with commercial ammo but resume with surplus, the problem is ammunition, not the firing system.
- TEST: Load one dummy round, then one live round in a known-good magazine. Fire the live round. Does the dummy round chamber cleanly on the next cycle? Stiff cycling suggests mainspring weakness or firing-pin-channel drag, which reduces strike force.
- TEST: If light strikes continue across multiple ammo brands, the firing system is the problem. Proceed to Step 3.
Fixed? Yes ➔ Ammunition isolation resolved it. Switch brands or lots.
Not Fixed ➔ Firing pin, mainspring, or headspace is involved. Proceed to Step 3.
Step 3: Workbench Fix (Tools required)
Goal: Replace worn pin or mainspring and verify safe function.
Tools Needed: Replacement firing pin, replacement mainspring, pin punch for FCG disassembly, caliper.
- Replace the firing pin if protrusion is below roughly 0.025 inches (reference value; confirm against manufacturer spec) or the pin shows pitting, corrosion, or bending. Use hardened steel pins only. Soft replacement parts batter themselves to death.
- Replace the mainspring if it feels mushy or if the hammer face shows flattening from repeated impact. Mainsprings are cheap insurance.
- Reassemble the bolt and FCG. Do not lubricate the firing pin channel. The AK firing pin channel runs dry. Oil attracts carbon and turns into sludge.
- Install the bolt carrier. Cycle the action by hand. The hammer should fall crisply against the firing pin tail with a sharp metallic snap.
- Load one round at the range, aim safely, and fire. If ignition is positive and immediate, load three rounds and confirm consistent function.
Reference Table: Light Primer Strikes
| Symptom | Likely Cause | How to Confirm | Fix | Skill Level |
|---|---|---|---|---|
| Shallow primer dent; click no bang | Firing pin channel gunk | Pin rattles poorly; channel dirty | Detail clean; run dry | Beginner |
| Shallow primer dent; click no bang | Firing pin too short/worn | Caliper reads < 0.025 in | Replace hardened firing pin | Intermediate |
| Shallow primer dent; click no bang | Weak mainspring | Spring collapses easily; hammer feels soft | Replace mainspring | Beginner |
| Shallow primer dent; click no bang | Deep-seated surplus primers | Only one ammo brand fails | Switch to commercial ammo | Beginner |
| Random light strikes across ammo | Headspace growing | No-go gauge closes | Consult gunsmith | Pro |
Pro Tip: Never oil the firing pin channel. The AK firing pin channel should be kept clean and dry. Oil plus carbon equals sludge. If you lubricated it in the past, detail strip and scrub with solvent until patches emerge clean and gray. Then keep it clean and dry.
Call a Pro: If a new firing pin and mainspring do not solve the problem, or if the No-Go headspace gauge closes, stop shooting. Headspace beyond no-go is a catastrophic failure risk. Bolt replacement (with headspace verification) is required before the rifle is safe to fire.
Runaway Fire (Hammer Follow): The Rifle Fires Without You
CRITICAL SAFETY WARNING: If your rifle ever fires more than one round per trigger pull, or continues firing after you release the trigger, STOP IMMEDIATELY. Point the muzzle in a safe direction. Remove the magazine. Pull the charging handle fully rearward. If your rifle supports bolt-hold-open, use it. Otherwise, manually hold the action open while inspecting. Do not chamber another round. Do not attempt live fire again until a known-good replacement FCG is installed and function-checked with dummy rounds. Runaway fire is a machine-gun malfunction and carries serious legal and physical consequences.
What it looks like: You pull the trigger for one shot. The rifle fires two, three, or empties the entire magazine in one burst. This is not a “fast trigger finger.” This is a mechanical failure of the fire control group.
Why it happens: The disconnector is supposed to catch the hammer after each shot and hold it until you reset the trigger. If the disconnector is worn, cracked, or its spring is broken, the hammer follows the bolt carrier forward and fires the next round automatically. A rounded sear face can also fail to hold the hammer in the cocked position, causing unintended release. Home-built AKs with improperly installed FCG pins or wallowed-out receiver holes are at higher risk because the parts do not align correctly.
Step 1: Field Check (30 seconds)
Goal: Confirm the failure mode with zero tools.
Tools: None.
- CHECK: With the rifle cleared and magazine removed, cock the hammer and pull the trigger. The hammer should fall.
- CHECK: Hold the trigger to the rear. Manually cycle the charging handle to cock the hammer. Slowly release the trigger. You should hear a distinct click as the disconnector releases the hammer to the sear. If there is no click and the hammer falls immediately, the disconnector is not catching.
- CHECK: Inspect the trigger and hammer pins. Do they wobble in the receiver holes? Wallowed-out holes let parts shift under recoil.
Fixed? Yes ➔ No gunsmith would call this fixed in the field. Even if the trigger test looks normal, the parts that caused runaway fire are worn beyond safe margin. Assume they will fail again.
No ➔ Do not range-test.
Step 2: Range Diagnosis (2 minutes)
Skipped. Do not live-fire test runaway fire. If the rifle fires more than one round per trigger pull, stop firing immediately, clear the rifle, and inspect the fire control group. This is not a range-diagnosis issue.
Do not proceed to live fire. Continue directly to Step 3: Workbench Fix.
Step 3: Workbench Fix (Tools required)
Goal: Replace the entire FCG as a matched set.
Tools Needed: Replacement FCG (matched hammer, trigger, disconnector, springs, and pins), pin punch, brass hammer.
- Remove the top cover, recoil spring, and bolt carrier.
- Drift out the trigger and hammer pins. Remove the old FCG.
- Inspect the receiver holes. If trigger or hammer pins wobble, the holes are wallowed out. Do not install a new FCG in a wallowed receiver. See the Call a Pro block below.
- Install the new FCG as a matched set. Do not mix hammers, triggers, or disconnectors from different manufacturers. Engagement surfaces are matched during manufacturing.
- Verify sear and disconnector engagement. Cock the hammer. It should sit securely on the sear face with no wiggle. Pull the trigger. The hammer should fall. Hold the trigger back, recock, release trigger slowly. The disconnector should transfer the hammer cleanly to the sear.
- Reassemble. Function-test with dummy rounds for 20 cycles before live fire.
Reference Table: Runaway Fire
| Symptom | Likely Cause | How to Confirm | Fix | Skill Level |
|---|---|---|---|---|
| Multiple rounds per trigger pull | Worn/cracked disconnector | Hammer falls on trigger reset; no click | Replace complete FCG | Intermediate |
| Multiple rounds per trigger pull | Rounded sear face | Hammer slips off sear under vibration | Replace complete FCG | Intermediate |
| Multiple rounds per trigger pull | Weak/broken disconnector spring | Spring coils gap or collapse | Replace complete FCG | Intermediate |
| Multiple rounds per trigger pull | Wallowed receiver holes | Pins wobble visibly in holes | Gunsmith repair or retire receiver | Pro |
Pro Tip: Never polish FCG engagement surfaces to “improve” trigger pull. Polishing removes the hardened layer and the sharp geometry that keeps the hammer captive. A trigger that feels lighter because you polished it is a trigger that may release the hammer unexpectedly under recoil.
Call a Pro: If the receiver trigger or hammer holes are wallowed out, do not install a new FCG and hope. The parts will shift under recoil and the malfunction will return. A gunsmith can weld and redrill FCG holes on some receivers, but this is advanced work. Budget builds with loose rivets or wallowed holes may not be worth the repair cost. Safety is not negotiable.
Double Feed: Two Rounds Competing for the Chamber
What it looks like: Two cartridges are jammed in the chamber at the same time. The bolt is locked up tight. The charging handle will not move. One round is partly chambered while the second round is stuck behind it at the magazine lips. This is a hard jam that stops the rifle cold.
Why it happens: A double feed occurs when the bolt strips a second round before the first round is fully chambered or before the first round was extracted. Common causes are over-inserted magazines, weak magazine springs that release rounds too early, and weak recoil springs that allow the bolt to move forward slowly enough for the magazine to present a second round before the first is seated. In rare cases, a worn bolt catch or magazine follower can cause premature second-round presentation.
Before blaming the magazine, confirm whether the first case or cartridge was actually extracted. A failure to extract can look like a double feed because the next round has nowhere to go.
Step 1: Field Check (30 seconds)
Goal: Clear the jam and confirm the cause.
Tools: None.
- CHECK: Attempt to pull the charging handle fully rearward. If your rifle supports bolt-hold-open, use it. Otherwise, manually hold the action open while inspecting. If it cannot move, the jam is mechanical. Do not force it.
- CHECK: Look at the magazine. Does it appear to sit higher than normal? Can you wiggle it fore and aft more than a few millimeters?
- CHECK: When did the jam happen? Immediately after inserting a new magazine? Or mid-magazine during normal firing?
Fixed? Yes ➔ If the jam cleared by locking the bolt, removing the magazine, and working the charging handle, and the bolt now cycles freely, the immediate obstruction is gone.
No ➔ Continue to Step 2.
Step 2: Range Diagnosis (2 minutes)
Goal: Isolate magazine, ejection timing, or bolt carrier function before bench work.
Tools: Known-good magazines (three minimum), dummy rounds, known-good brass ammo.
- TEST: Remove the suspect magazine. Insert a known-good magazine with three dummy rounds. Cycle by hand. Does each round chamber cleanly without a second round trying to enter? If yes, the original magazine was causing premature overfeed.
- TEST: Load three known-good magazines with brass ammo of the same weight. Fire one round per magazine. Does the double feed follow one magazine or occur across all? If it follows a single magazine, replace it.
- TEST: Confirm whether the bolt carrier travels fully rearward during live fire. Short-stroked rifles return to battery before extraction is complete, leaving a spent case in the chamber while the next round tries to feed.
- TEST: Observe ejected brass direction and distance before the double feed happens. If cases barely clear the ejection port, ejection failure is the primary fault and double feed is secondary.
Fixed? Yes ➔ Magazine swap or ammunition change resolved the issue.
Not Fixed ➔ Ejector, extractor, or bolt timing is involved. Proceed to Step 3.
Step 3: Workbench Fix (Tools required)
Goal: Replace worn parts and correct feeding geometry.
Tools Needed: Replacement recoil spring, replacement magazine(s), new mainspring (if weak). Dummy rounds for function testing.
- Remove the magazine. Pull the charging handle fully rearward. If your rifle supports bolt-hold-open, use it. Otherwise, manually hold the action open while inspecting. Rock the magazine forward and withdraw it completely. Do not force it.
- With the magazine out, sharply pull the charging handle to the rear to clear both rounds from the chamber. The bolt should slam rearward and stay open.
- Visually inspect the chamber to confirm no rounds remain.
- Inspect the recoil spring around the 5,000 to 7,000 round mark, or sooner if cycling changes. A weak spring is the most common cause of repeated double feeds beyond magazine issues.
- Discard or rebuild magazines that caused the jam. Feed lips that released a round too early will do it again.
- Function-test with dummy rounds for 20 cycles before returning to live fire.
Workbench Pick
ALG Defense AK Recoil Spring
$13.25 at ALG Defense
Enhanced recoil spring for AK-pattern rifles. Cures stovepipes, short-stroking, and inconsistent cycling.
Check Price at ALGReference Table: Double Feed
| Symptom | Likely Cause | How to Confirm | Fix | Skill Level |
|---|---|---|---|---|
| Two rounds in chamber; bolt stuck or does not close | Over-inserted magazine | Jam happens immediately after mag insertion | Hold bolt rearward; seat magazine firmly | Beginner |
| Two rounds in chamber; bolt stuck or does not close | Weak magazine spring | Follower returns sluggishly; feeds early | Replace magazine | Beginner |
| Two rounds in chamber; bolt stuck or does not close | Weak recoil spring | Spring compresses easily; short ejection | Replace recoil spring | Beginner |
| Random double feeds mid-magazine | Worn bolt or mag catch | Happens across multiple magazines | Inspect bolt rail wear; gunsmith if severe | Pro |
Pro Tip: Practice malfunction clearance until it is automatic. At the range, deliberately induce a double feed using dummy rounds. Time yourself on the clearance. Under stress, your hands will do what they practiced. If you have never cleared a double feed before the day you need to, you are fighting two battles at once.
Call a Pro: If the double feed continues after replacing magazines and springs, or if the bolt rails show galling, cracks, or excessive wear, the receiver geometry may be out of spec. This is common on budget builds where the ejection port or feed geometry was machined incorrectly. A gunsmith with AK receiver experience can assess whether the rifle is salvageable.
Stovepipe: Failure to Eject
What it looks like: A spent casing stands vertically in the ejection port, pinched between the bolt face and the receiver wall. The bolt is forward but not fully in battery. The next round may or may not have fed.
Why it happens: The ejector is a small metal protrusion on the trunnion that kicks the spent case out during rearward bolt travel. If the bolt does not move back with enough energy, the case does not hit the ejector with enough force to clear the port. Causes include a weak recoil spring, a fouled bolt carrier group adding friction, loose ejector rivets that let the ejector wobble, or underpowered ammunition that does not generate enough gas pressure.
Step 1: Field Check (30 seconds)
Goal: Identify if the case is stuck or just under-ejected.
Tools: None.
- CHECK: Was the stovepipe preceded by a weak ejection pattern? Were previous cases barely clearing the port or landing at your feet?
- CHECK: Try pulling the charging handle to the rear. Does the stuck case fall free easily? Or is it wedged tight?
- CHECK: Did the stovepipe happen mid-magazine or only on the last round? A last-round stovepipe may be a magazine issue, not a gas or spring issue.
Fixed? Yes ➔ If the case cleared with a slight tug and the bolt cycles freely afterward, it was a one-off under-ejection.
No ➔ Continue to Step 2.
Step 2: Range Diagnosis (2 minutes)
Goal: Isolate ammunition, gas system strength, and magazine influence before inspecting springs or ejector parts.
Tools: Known-good brass-cased ammunition.
- TEST: Switch to known-good brass-cased ammunition. Quality brass-cased ammunition gives you a cleaner comparison point than mixed surplus or steel-cased ammo. If brass runs fine but steel stovepipes, suspect ammo behavior, chamber fouling, gas-system margin, or carrier friction before blaming the ejector.
- TEST: Observe whether cases barely clear the ejection port or land at the shooter’s feet. Weak ejection distance is a gas system or spring issue, not an extractor issue.
- TEST: Confirm whether the stovepipe appears only with one ammo type or one magazine. If it follows the magazine, feed timing and follower tilt are the culprits.
- TEST: Confirm whether the stovepipe happens only on the last round of the magazine. If yes, the follower or spring is losing pressure as the stack empties.
Fixed? Yes ➔ Ammunition or magazine isolation eliminated the stovepipe.
Not Fixed ➔ Spring, gas, ejector, or extractor wear is involved. Proceed to Step 3.
Step 3: Workbench Fix (Tools required)
Goal: Replace weak components and verify ejection energy.
Tools Needed: Replacement recoil spring, bronze bore brush, chamber brush, solvent.
- Replace the recoil spring if free length drops below the manufacturer’s reference length, if tension feels weak compared to a known-good spring, or if cycling symptoms point to spring fatigue. A weaker spring is one common cause of weak ejection. But weak ejection can also come from low gas pressure, a dirty chamber, worn extractor geometry, or poor ammo. If a new spring changes the symptom but does not eliminate it consistently, continue diagnosing the gas system, chamber, magazines, and receiver geometry.
- Clean the bolt face and bolt carrier rails thoroughly. Carbon buildup adds friction during cycling.
- Check the extractor and ejector for chips or wear. A chipped ejector will not kick cases out cleanly.
- If ejector rivets are loose, the trunnion needs professional attention. Ejector rivets require a hydraulic press to set correctly.
- Test at the range with three rounds, then a magazine, observing ejection pattern. Cases should fly consistently to the right and clear the shooter’s body.
Workbench Pick
Magpul PMAG AK/AKM Gen M3 7.62x39mm 30-Round Magazine
$24.99 at Brownells
Reliable AK magazine for troubleshooting failure-to-feed, seating, and double-feed issues.
Check Price at BrownellsReference Table: Stovepipe / Failure to Eject
| Symptom | Likely Cause | How to Confirm | Fix | Skill Level |
|---|---|---|---|---|
| Case vertical in ejection port | Weak recoil spring | Spring < 14 in; compresses easily | Replace recoil spring | Beginner |
| Case vertical in ejection port | Fouled bolt carrier | Rails black with carbon; bolt sticky | Clean rails and bolt face | Beginner |
| Case vertical in ejection port | Loose ejector rivets | Ejector wiggles; rivets move | Gunsmith trunnion repair | Pro |
| Case vertical in ejection port | Underpowered ammo | Brass cures it; steel fails | Test with brass; diagnose gas system before modifying | Beginner |
| Last-round stovepipe only | Magazine follower/spring | Only on final round | Replace magazine | Beginner |
Pro Tip: Wolff Gunsprings makes enhanced-rate recoil springs for AKs that improve reliability with marginal ammunition or in cold weather. The extra spring rate costs you nothing in felt recoil but buys consistent cycling when conditions are bad. Use spring changes as a diagnostic clue, not a cover-up. If a spring change only hides the problem or shifts the malfunction, continue diagnosing the gas system, chamber, magazines, and receiver geometry. Replace annually even if round count is low; springs take a set over time just sitting compressed. Start with standard-weight replacement springs unless the rifle manufacturer or an AK armorer recommends otherwise.
Call a Pro: If loose ejector rivets are confirmed, do not continue firing. The ejector can depart the rifle under pressure and become a projectile. Trunnion rivet work requires a hydraulic press and headspace verification afterward. This is gunsmith territory, not a garage fix.
Out-of-Battery Discharge: The Bolt Is Not Closed When It Fires
CRITICAL SAFETY WARNING: An out-of-battery discharge means the rifle fired while the bolt was not fully locked into the trunnion. The case head is unsupported and can rupture, sending hot gas and metal fragments directly back into the shooter’s face and hands. If you experience a popped primer, a bulged case, gas spraying from the receiver, or unusual recoil, STOP FIRING IMMEDIATELY. Do not chamber another round. Clear the weapon and inspect before firing again.
What it looks like: The rifle fires with a louder-than-normal report. You feel gas blowback in your face. The ejected case shows a bulged primer pocket, a split case head, or a popped primer. The bolt may not have moved fully forward before ignition.
Why it happens: The firing pin struck the primer before the bolt rotated and locked fully into the trunnion. Causes include a stuck-forward firing pin (floating pin), excessive headspace that allows the case to sit too far forward, worn locking lugs that prevent full rotation, or a dirty bolt face that holds the case too far forward, causing the firing pin to reach the primer before lockup completes.
Step 1: Field Check (30 seconds)
Goal: Confirm the rifle is unsafe before touching tools.
Tools: None.
- CHECK: Did the shooter feel gas or debris on the face? Did the case show a bulged head or popped primer?
- CHECK: Remove the bolt carrier. Shake the bolt. Does the firing pin rattle freely, or is it stuck in the forward position? A stuck-forward pin is the most common cause.
- CHECK: Are all three locking lugs on the bolt intact, with no cracks or chips? Look especially at the top lug, which takes the most stress.
Fixed? Yes ➔ Only if the firing pin was simply dry and sticky and now moves freely. Even then, this warrants Step 2 before declaring the rifle safe.
No ➔ Continue to Step 2.
Step 2: Range Diagnosis (2 minutes)
Skipped. Do not fire again with an out-of-battery discharge condition. A cartridge fired with the bolt not fully closed can rupture, causing catastrophic case head failure and injury. This is not a range-diagnosis issue.
Do not proceed to live fire. Continue directly to Step 3: Workbench Fix.
Step 3: Workbench Fix (Tools required)
Goal: Replace safety-critical components.
Tools Needed: Replacement bolt (if headspace failed), replacement firing pin, headspace gauges, detail-cleaning kit.
- If the rifle closes on a No-Go gauge, stop firing. A different bolt may change headspace, but any bolt change must be verified with proper gauges before live fire. If the rifle still fails headspace checks, the barrel, trunnion, or receiver geometry needs professional evaluation.
- If the bolt face shows erosion, chips, or cracks, replace the bolt.
- If the firing pin is stuck forward, clean the channel obsessively and replace the pin if it shows pitting or corrosion.
- Do not attempt to recut locking lugs, weld trunnions, or machine bolt faces at home. Bolt geometry is a safety-critical dimension.
- After any bolt replacement, verify with both Go and No-Go gauges before live fire. If No-Go still closes, retire the rifle or have a gunsmith evaluate barrel and trunnion.
Workbench Pick
Clymer 7.62x39mm Headspace Gauge Set
$72.00 at Brownells
Go/No-Go gauge set for AK-47. Essential for diagnosing headspace, out-of-battery, and light primer strike.
Check Price at BrownellsReference Table: Out-of-Battery Discharge
| Symptom | Likely Cause | How to Confirm | Fix | Skill Level |
|---|---|---|---|---|
| Bulged case; gas in face; loud report | Floating firing pin | Pin stuck forward; does not rattle | Clean channel; replace pin | Intermediate |
| Bulged case; gas in face; loud report | Excessive headspace | Closes on No-Go gauge | Replace bolt; recheck headspace | Pro |
| Bulged case; gas in face; loud report | Worn locking lugs | Lugs chipped or rounded | Replace bolt; gunsmith inspects trunnion | Pro |
| Bulged case; gas in face; loud report | Dirty bolt face | Bolt face black with carbon | Clean bolt face and recess | Beginner |
| Unusual recoil; split case head | Overpressure ammunition | Only one lot does it | Discard suspect ammo | Beginner |
Pro Tip: Every AK owner should own a set of Go/No-Go headspace gauges. They usually cost less than a ruined range day and answer the single most important safety question about your rifle: Is it safe to fire? Use them after any bolt replacement, any parts kit build, and any time you experience out-of-battery symptoms, case bulging, or popped primers.
Call a Pro: If headspace exceeds No-Go after bolt replacement, the barrel or trunnion is worn. Do not fire the rifle. Options include rebarreling (expensive, usually exceeds value of budget rifles) or retiring the receiver. A gunsmith can measure barrel extension, trunnion wear, and recommend whether the rifle is worth saving. Budget builds that fail headspace are often a total loss.
Safety Lever Binds or Won’t Stay Engaged
What it looks like: The safety lever is hard to flip up or down. It slips out of the SAFE position during firing. It does not cover the ejection port when engaged. Or it engages so loosely that it rattles.
Why it happens: The AK safety lever is a spring-tensioned sheet-metal selector. It blocks trigger movement and also acts as a dust cover over the ejection port. It stays in position through lever tension, receiver geometry, and the selector stop surfaces. Over time, the lever can bend, the contact surface can wear, burrs can form, or the receiver selector area can become damaged. When that happens, the safety may bind, feel loose, fail to block the trigger correctly, or slip out of position.
Step 1: Field Check (30 seconds)
Goal: Confirm selector lever tension and receiver contact condition.
Tools: None.
- CHECK: Flip the safety from SAFE to FIRE repeatedly. Do you feel two distinct clicks? Or is the motion mushy?
- CHECK: Remove the safety lever by rotating it to the bottom position and lifting it off. Look at the selector engagement points where the lever contacts the receiver. Are there sharp contact surfaces, or are they rounded and worn?
- CHECK: Check selector lever tension. Does the lever press firmly against the receiver, or does it feel loose and floppy?
Fixed? Yes ➔ Correct lever tension or a replacement selector restores positive engagement.
No ➔ Continue to Step 2.
Step 2: Range Diagnosis (2 minutes)
Skipped. Do not live-fire a rifle with questionable safety function. If the safety lever does not block trigger movement or slips out of position, the rifle is unsafe to discharge. This is not a range-diagnosis issue.
Do not proceed to live fire. Continue directly to Step 3: Workbench Fix.
Step 3: Workbench Fix (Tools required)
Goal: Replace or repair worn parts.
Tools Needed: Replacement safety lever, replacement selector spring, fine sandpaper or polishing wheel.
- Replace or restake the selector spring. A replacement takes two minutes on most designs.
- If the safety lever shows burrs, polish the contact path with fine sandpaper. Do not remove material. Just smooth the surface.
- If the contact surfaces on the receiver are worn or rounded off, the receiver selector area is damaged. This requires receiver evaluation or gunsmith welding and re-machining.
- Reinstall the safety. Flip from SAFE to FIRE 20 times. It should click into each position with authority.
Reference Table: Safety Lever Issues
| Symptom | Likely Cause | How to Confirm | Fix | Skill Level |
|---|---|---|---|---|
| Hard to flip; binds | Burred contact path on lever or receiver | Rough surface visible; burr catches during flip | Polish with fine paper | Beginner |
| Slips out of SAFE | Worn selector contact surfaces; loss of spring tension | Contact points worn; no positive engagement | Replace safety lever; inspect spring | Beginner |
| Slips out of SAFE | Missing/broken spring | Spring absent or coils separated | Inspect selector tension | Beginner |
| Lever bent/damaged | Used as charging handle | Lever visibly bowed or twisted | Replace lever; stop the habit | Beginner |
Pro Tip: Do not use the safety as a charging handle. It is a safety device, not a bolt handle. Every time you flip it down against bolt carrier pressure, you bend the lever and wear the contact surfaces. The AK charging handle is on the bolt carrier for a reason. Use it.
Call a Pro: If the receiver selector area itself is wallowed out, a new spring and lever will not fix it. Welding and re-machining the contact surfaces is possible on stamped receivers but requires a gunsmith with AK receiver experience. On milled receivers, the fix is more involved.
Short Stroking: The Bolt Does Not Travel Far Enough
What it looks like: The rifle fires, but the bolt barely moves rearward. The spent case stays in the chamber or ejects weakly. The next round does not feed. The bolt may close on an empty chamber. The rifle effectively becomes a single-shot.
Why it happens: Short stroking means there is not enough energy in the operating system to complete the full cycle of extraction, ejection, and feeding. On an AK, the gas system is the engine. The gas port in the barrel taps expanding gas and sends it through the gas tube to push the piston. The piston drives the bolt carrier rearward. If any part of that chain loses energy from a clogged port, cracked tube, bent piston, weak recoil spring, or excessive friction, the bolt does not travel far enough.
Step 1: Field Check (30 seconds)
Goal: Identify if the problem is mechanical or ammunition-related in 30 seconds.
Tools: None.
- CHECK: Did the problem start after switching ammunition brands? Some imports load light for reduced recoil.
- CHECK: Look at the gas tube lever at the rear sight block. Is it fully flipped down and locked? A partially raised lever leaks gas.
- CHECK: Remove the bolt carrier. Compress it by hand against the recoil spring. Does the spring feel firm, or does it collapse with little resistance?
Fixed? Yes ➔ Brass ammunition cycles correctly while steel does not; the issue is ammo, not the rifle.
No ➔ Continue to Step 2.
Step 2: Range Diagnosis (2 minutes)
Goal: Isolate ammunition-driven pressure from gas-system or mechanical causes using controlled live-fire confirmation.
Tools: Known-good brass-cased ammo, known-good steel-cased ammo, magazines of varying capacity.
- TEST: Fire five rounds of brass-cased ammo and observe brass ejection distance and bolt carrier travel. Quality brass-cased ammunition gives you a stronger baseline than mixed surplus or steel-cased imports. If brass cycles fully but steel short-strokes, the rifle may be on the edge for gas-system margin, chamber drag, carrier friction, or ammo pressure.
- TEST: Confirm whether the short-stroking happens when the rifle is cold, hot, or both. Cold-only failures suggest carrier lubrication, friction, or tight clearances; hot-only failures suggest gas port blockage or spring fatigue.
- TEST: Compare full-capacity magazines to five-round magazines. If the rifle short-strokes only on a full mag, the additional spring resistance from a compressed follower may be slowing carrier travel.
- TEST: Observe whether short-stroking began after changing ammunition brands. If yes, the new load is simply too light for your gas port diameter.
Fixed? Yes ➔ Ammunition change or magazine selection resolved short-stroking.
Not Fixed ➔ Gas port, tube, recoil spring, or carrier wear is involved. Proceed to Step 3.
Step 3: Workbench Fix (Tools required)
Goal: Restore gas system integrity and eliminate friction.
Tools Needed: Gas port cleaning tool, replacement gas tube, replacement gas piston, cleaning solvent.
- Clean the gas port by hand with a non-marring pick, pipe cleaner, carbon scraper, or manufacturer-appropriate gas port cleaning tool. Do not use power tools. Do not enlarge the port. Remove carbon until a cleaning rod passes freely.
- Replace cracked gas tubes immediately. A cracked gas tube vents gas, reduces cycling energy, and can worsen rapidly under heat.
- Replace the gas piston if the face is concave or the piston binds in the carrier bore. The retaining pin should be re-peened or staked after installation.
- Clean the bolt carrier group thoroughly. Pay special attention to the piston face, the carrier rails, and the bolt face recess.
- Do not lubricate the gas piston or gas tube. Oil burns to carbon instantly under firing heat. Run the gas system dry.
- Test with brass ammunition first. If brass cycles but steel does not, the gas system is marginal. Do not enlarge the gas port or add an enhanced spring as a permanent fix without first diagnosing gas block alignment, port obstruction, and bolt carrier friction. Spring changes can affect symptoms, but they should not be used to hide gas, chamber, or receiver problems.
Workbench Pick
ALG Defense AK Recoil Spring
$13.25 at ALG Defense
Enhanced recoil spring for AK-pattern rifles. Cures stovepipes, short-stroking, and inconsistent cycling.
Check Price at ALGWorkbench Pick
Breakthrough Clean Military-Grade Solvent
$19.99 at Breakthrough Clean
Non-toxic solvent for AK chambers and gas tubes. Dissolves carbon before headspace checks and after range sessions.
Check Price at BrownellsReference Table: Short Stroking
| Symptom | Likely Cause | How to Confirm | Fix | Skill Level |
|---|---|---|---|---|
| Bolt barely moves; no ejection | Clogged gas port | Port blocked with carbon | Clean port manually | Beginner |
| Bolt barely moves; no ejection | Weak recoil spring | Spring compresses easily; short free length | Replace recoil spring | Beginner |
| Bolt barely moves; no ejection | Cracked gas tube | Crack visible where tube meets block | Replace gas tube | Beginner |
| Bolt barely moves; no ejection | Bent/worn gas piston | Piston face concave; binds in carrier | Replace piston; stake pin | Intermediate |
| Short strokes only with steel ammo | Underpowered ammunition | Brass works fine | Test with brass; diagnose gas system before modifying | Beginner |
Pro Tip: Never soak the gas piston in solvent and leave it. Always dry it completely before reassembly. Residual solvent evaporates and leaves carbon even faster than bare metal. A dry, clean piston runs better than a wet one.
Call a Pro: Gas block misalignment is not a user fix. The gas block must be centered perfectly over the gas port. If it is crooked from a poor build, gas leaks past the port and the rifle never cycles properly. Drifting the gas block requires heating, drilling out pins, and installing new pins after alignment. This is gunsmith work.
Magazine Won’t Seat or Lock
What it looks like: The magazine rocks into the well but does not click into place. It wobbles front to back. It falls out when the rifle is inverted. Or it requires so much force that you fear bending the receiver.
Why it happens: AK magazines lock at two points: the front locking lug engages the front trunnion groove, and the magazine catch on the trigger guard engages the rear tab of the magazine. If the magazine catch rounds off from wear, the rear tab cannot lock securely. If the receiver dimples (the pressed indentations that guide the magazine body) are deformed, the magazine body is squeezed out of alignment. If the magazine front lug is out of spec, it may not reach the trunnion groove. Yugo-pattern rifles have slightly different mag wells that reject standard AK mags entirely.
Step 1: Field Check (30 seconds)
Goal: Determine magazine vs. receiver.
Tools: None.
- CHECK: Try five different magazines from different manufacturers. If all of them wobble, the problem is the rifle. If only one fails, the magazine is out of spec.
- CHECK: Look at the magazine catch on the trigger guard. It should present a sharp, square locking surface. Is it rounded, chipped, or bent?
- CHECK: Inspect the receiver dimples under the magazine well. Are they symmetrical? Are they dented inward too far?
Fixed? Yes ➔ Multiple known-good magazines seat and lock perfectly. Discard the out-of-spec magazine.
No ➔ Continue to Step 2.
Step 2: Range Diagnosis (2 minutes)
Goal: Isolate magazine model compatibility and seating behavior before inspecting catch parts.
Tools: Known-good magazines from different manufacturers, dummy rounds.
- TEST: Try five different magazines (surplus steel, PMAG, US Palm, etc.). If the seating issue follows the magazine brand, the magazine body is a different pattern, or the follower height is wrong for your mag well geometry.
- TEST: If all magazines wobble, the problem is the rifle. Insert each with the bolt held rearward (or manually held open) and observe whether wobble increases.
- TEST: Try magazines that work in a known-good AK of the same pattern. If they seat in the other rifle but wobble in yours, receiver or trunnion geometry is at fault.
- TEST: Confirm Yugo-pattern compatibility if you are using Yugo-pattern magazines. Many Yugo magazines have a different spine height and may not lock on non-Yugo rifles.
Fixed? Yes ➔ Magazine selection or seating technique resolved the issue.
Not Fixed ➔ Magazine catch, receiver geometry, or rivet failure is involved. Proceed to Step 3.
Step 3: Workbench Fix (Tools required)
Goal: Replace worn catch or correct receiver fit.
Tools Needed: Replacement magazine catch, drift pin, brass hammer, file (for minor receiver dimple tuning).
- Replace the magazine catch by drifting out the retaining pin with a punch. Install the new catch and confirm sharp engagement.
- For receiver dimples that are too tight, some builders lightly file the inner surface. Go slow; you cannot put metal back. This is a last resort.
- On Yugo rifles, either use Yugo magazines or have a gunsmith open the mag well to standard AK spec.
- Test with all magazines. Each should rock in with a firm tap, lock with an audible click, and remain secure when inverted.
Reference Table: Magazine Won’t Seat
| Symptom | Likely Cause | How to Confirm | Fix | Skill Level |
|---|---|---|---|---|
| Magazine wobbles; falls out | Rounded magazine catch | Catch surface rounded or chipped | Replace magazine catch | Beginner |
| Magazine wobbles; falls out | Receiver dimples too tight | All mags feel squeezed; hard insertion | File dimples carefully or gunsmith | Intermediate |
| One magazine only fails | Magazine out of spec | Other mags work fine | Replace magazine | Beginner |
| Standard mags won’t fit at all | Yugo-pattern mag well | NPAP/OPAP rifle | Use Yugo mags or gunsmith mod | Pro |
Pro Tip: Seat magazines with the bolt open when possible. Many feed and seating problems become easier to diagnose when the bolt is not adding pressure to the top round. Slap the magazine heel firmly with your palm. Do not ride it in gently. You should hear and feel a positive click.
Call a Pro: If the receiver dimples are crushed, asymmetric, or the front trunnion is cracked, the receiver geometry is beyond user correction. A gunsmith can evaluate whether the receiver is salvageable or should be retired. Budget builds with receiver dimple problems are often not worth the repair cost compared to a new rifle.
AK Maintenance Schedules
Maintenance note: These intervals are starting points. Adjust them based on ammunition, environment, suppressor use, corrosive primers, fouling, and how the rifle actually behaves.
The AK runs dirty better than most rifles, but that does not mean it runs well dirty. Carbon buildup causes extraction failures, fouled bolt faces cause light strikes, and a clogged gas port turns a semi-auto into a manual-action rifle. Follow this schedule and you avoid 90 percent of AK malfunctions.
Pro Tip: Prevention beats cure. A 15-minute cleaning after every range trip costs less than a stuck case on the firing line. The AK tolerates neglect, but tolerance is not the same as immunity. Reliability is earned, not granted.
Before Every Range Trip
- ☐ CHECK: Confirm the safety functions. Flip from SAFE to FIRE and back. It should click into each position.
- ☐ CHECK: Look into the chamber. It should be clean and dry. No oil in the chamber.
- ☐ CHECK: Test magazine fit with each magazine you plan to use. They should seat and lock with a firm tap.
- ☐ CHECK: Inspect the extractor hook and spring with the bolt carrier removed. Everything should look sharp and firm.
After Every Range Trip
- ☐ TASK: Run a bore snake or brush through the bore three times. Patch until clean.
- ☐ TASK: Scrub the chamber with a chamber brush and solvent. The chamber is where extraction failures begin.
- ☐ TASK: Wipe carbon from the bolt face, extractor, and firing pin tail.
- ☐ TASK: Remove the gas tube. Wipe carbon from the piston face and tube interior. Do not lubricate the gas system.
- ☐ TASK: Dry all metal parts. Apply a thin film of CLP to bolt rails, FCG pins, and safety detent path only.
Monthly (Even If Not Fired)
- ☐ TASK: Cycle the action by hand 10 to 15 times. Stiffness means the rails are dry.
- ☐ TASK: Check for surface rust on the bore, bolt, and receiver. AKs rust if stored in humid environments. A quick wipe with oiled cloth prevents pitting.
- ☐ TASK: Check magazine springs. Push the follower down and release. It should snap back.
Every 5,000 Rounds
- ☐ TASK: Detail strip the bolt. Clean the firing pin channel until patches emerge clean.
- ☐ TASK: Inspect the extractor and extractor spring. Replace only if the extractor hook is rounded or extraction degrades. These are wear items, not calendar items.
- ☐ TASK: Replace the recoil spring. Measure free length against the manufacturer’s reference length. If it is short, weak, or inconsistent, replace it.
- ☐ TASK: Check headspace with Go/No-Go gauges. High-round-count rifles, unknown builds, and rifles showing pressure or extraction signs should be verified.
- ☐ TASK: Inspect front trunnion rivets. No movement. No gaps.
Annually
- ☐ TASK: Complete inspection even if the rifle was not fired. Springs take a set over time just sitting.
- ☐ TASK: Inspect gas block alignment and gas tube condition. Look for cracks from heat cycling.
- ☐ TASK: Re-lubricate all metal surfaces for long-term storage. Wipe dry before shooting.
| Interval | Task | Skip At Your Own Risk |
|---|---|---|
| After every range trip | Clean bore, chamber, bolt face, gas tube | Carbon hardens; extraction fails |
| Monthly | Cycle action; check rust; test mag springs | Spring set; rust pitting; action seizes |
| Every 5,000 rounds | Inspect extractor, test recoil spring, check headspace | Field failure; headspace beyond safe limits |
| Annually | Complete inspection; gas system; storage lube | Heat-crack gas tube; corrosion in storage |
When to Replace Parts
Service-life note: Round counts and measurements in this guide are conservative reference points, not universal service limits. AK-pattern rifles vary widely by country of origin, builder, receiver type, caliber, spring design, and parts quality. Confirm critical dimensions against your exact rifle and manufacturer documentation.
AK parts wear on a schedule, but the exact mileage varies by rifle, ammunition, and use. The extractor that fails on round 5,001 did not suddenly break; it was telling you for a thousand rounds that the hook was rounding off. Inspect parts regularly and replace them when they show wear, not just because a round count says so.
Pro Tip: Carry a small parts kit in your range bag. Extractor, extractor spring, firing pin, recoil spring. Cost varies by brand and source, but the parts are cheap relative to a ruined range day. The day one of these parts fails, you will be the shooter who fixes it on the spot instead of packing up and going home.
| Part | Inspect Around | Replace When | Warning Signs | Skill Level |
|---|---|---|---|---|
| Extractor + spring | Inspect every 5,000 rounds or when extraction degrades | Hook is rounded, spring is weak, or rim grip is inconsistent | Stuck cases; rim cuts; extraction fails after cleaning | Beginner |
| Recoil spring | Conservative inspection around 5,000 rounds or during annual service | Free length drops below reference; loses tension; stovepipes appear | Short-stroking; stovepipes; feeble or random ejection direction | Beginner |
| Magazine spring | Inspect around 3,000-5,000 cycles | Spring cannot hold top round firmly against feed lips | Nosedive feeding; double feeds; follower sluggish | Beginner |
| Mainspring (hammer spring) | Inspect around 10,000 rounds | Spring feels slack; hammer strike is weak | Light primer strikes; mushy trigger; failure to fire | Beginner |
| Firing pin | Inspect around 10,000 rounds or when light strikes increase | Pitting, shortened protrusion, or channel debris | Light primer strikes; inconsistent ignition; firing pin channel carbon | Intermediate |
| Fire control group | Inspect around 10,000-20,000 rounds | Hammer follow; trigger reset issues; sear not holding | Runaway fire; trigger reset failures; hammer follow; unsafe selector function | Intermediate |
| Safety lever | Inspect around 15,000 rounds | Bend, burr, or loss of selector tension causing loose retention | Slips out of position; does not block trigger on safe; lever hangs or grinds | Beginner |
| Gas piston | Inspect around 20,000 rounds | Bent, cracked face, concave wear, or carbon buildup preventing full travel | Short stroking; gas system energy loss; carrier movement sluggish or incomplete | Intermediate |
| Barrel (chrome-lined) | Periodically; mileage varies widely by quality, ammo, and heat | Throat erosion; keyholing; degraded accuracy | Group size opening; visible throat wear; copper fouling pattern changes | Pro |
Warning: These lifespans are for quality AKs with proper maintenance. Budget builds, corrosive ammunition, and harsh environments reduce service life significantly. If you run corrosive surplus 7.62×39, double your cleaning frequency and inspect springs more often and replace them when wear signs appear.
⚠ Time to Call a Pro
Stop. If you worked through all three steps for a given failure mode and your AK is still failing, put the tools down. This is not a failure. This is knowing your limits.
Take your rifle to a gunsmith if any of the following apply:
- The rifle closes on a No-Go or Field gauge, or still fails headspace checks after a verified bolt change
- Cracks in the front trunnion, receiver, or bolt body
- Loose or moving rivets anywhere on the receiver
- Barrel needs replacement or reprofiling
- Gas block is misaligned or leaking and the port was not simply clogged
- Front sight is canted and you cannot zero the rifle
- You attempted repairs and the problem persists across multiple components
How to find a qualified AK gunsmith: General gunsmiths may not have the tools or experience for AK-specific work. Look for:
- AK receiver-building experience (rivet presses, barrel population, headspace verification)
- An FFL with a storefront that shows AK portfolio work
- Manufacturer-authorized service centers if your rifle is still under warranty
- Forums and communities like AKFiles or Primary Arms forum, where builders post their work
Pro Tip: Know your limits. An hour of armorer time is cheaper than a ruined rifle or an injury. Headspace verification costs less than guessing wrong. A rivet press job costs less than a new receiver. When in doubt, ask a pro before you turn a fixable problem into an expensive mistake.
Extended FAQ: Common Questions Answered
Q: How do I know if my AK has headspace issues?
You need headspace gauges. Go, No-Go, and Field gauges for 7.62×39 (or your caliber). Remove the bolt carrier and insert the bolt alone into the chamber with the Go gauge. The bolt should close completely. Insert the No-Go gauge. The bolt should not close. If it closes on No-Go, stop shooting.
Look at fired cases for deformation marks, bulging, or pushed-out primer pockets. These indicate excessive pressure. If you see these signs, check with proper gauges before firing again. New AKs should pass Go and No-Go. Field gauges indicate the absolute limit – rifles exceeding a Field gauge are unsafe and should be removed from service.
Q: Can I use AR-15 tools on my AK?
No. The AK and AR-15 are completely different mechanically. AR armorers wrenches use wrong pin sizes, AR chamber brushes have wrong dimensions, and AR vice blocks do not fit AK receivers.
General tools transfer: pin punches, brass hammers, needle-nose pliers, cleaning solvents. AK-specific tools you need include 4.5mm and 5.5mm barrel pin punches, AK chamber brushes in your caliber, a sight pusher or brass hammer for front sight drums, and headspace gauges for 7.62×39.
Q: Why does my AK fail to extract only with steel-cased ammo?
Steel does not seal the chamber like brass. Brass expands under pressure and grips the chamber walls. Steel stays harder, leaving gaps that allow carbon to blow by and accumulate between the case and chamber wall. Over 200 to 300 rounds, that carbon builds a crust that prevents extraction.
The fix is aggressive chamber cleaning. Use a chamber brush and solvent regularly when shooting steel-cased ammunition. A 200 to 300 round interval is a conservative starting point for dirty rifles, tight chambers, or high-volume range days. A chamber mop soaked in solvent between range sessions helps. If you run mostly steel, consider cleaning mid-range-session rather than waiting until you get home.
Q: Is it normal for my AK to have loose rivets?
No. Loose rivets are never normal. The AK receiver is a 1mm stamped steel shell held together by rivets at the front trunnion, rear trunnion, and trigger guard. If rivets move, the receiver is structurally unsound.
Check the front trunnion area. If you feel clicking or see gaps where the trunnion meets the receiver walls, do not fire the rifle. Some gunsmiths can weld and re-press rivets, but this is specialized work. Budget builds with loose rivets may not be worth repair. Factory rifles with loose rivets should go back to the manufacturer.
Q: How tight should the magazine fit?
AK magazines rock into place with firm pressure and lock securely. They should not rattle, wobble, or fall out when inverted. Insert the front locking lug first, then rock the magazine rearward until the catch clicks. A firm slap on the bottom confirms seating.
Too tight usually means over-tight receiver dimples. On new builds, this may resolve with use as the rifle breaks in. If problems persist beyond 500 rounds, the receiver geometry may be out of spec. Too loose means a worn magazine catch. Yugo AKs have different mag wells and may not accept standard AK magazines without gunsmith modification.
Q: Can I replace parts myself or do I need a gunsmith?
Many AK parts are user-serviceable. Recoil spring, extractor, firing pin, magazine catch, safety lever, and pistol grip require only basic tools.
Gunsmith work includes barrel replacement, front trunnion riveting, gas block alignment, rear sight block installation, and trigger guard riveting. Knowing the difference saves you money and prevents damage. If you are unsure, take pictures and post them on a forum or consult a gunsmith before turning a wrench.
Q: Why does my AK keyhole at 100 yards?
Keyholing means the bullet is tumbling. Causes include excessive throat erosion, an obstruction in the bore, or wrong bullet diameter (shooting .311 bullets in a .308 bore).
Stop shooting immediately. Check the bore for obstructions. If the bore is clear, measure the bore diameter or have a gunsmith check it. A worn barrel requires rebarreling, which can cost more than a budget AK is worth. If the keyholing happens only with one type of ammunition, try a different brand before condemning the barrel.
Q: Should I chrome-line my AK barrel?
You cannot chrome-line an existing barrel. Chrome lining is a manufacturing process done during barrel production.
Most quality AKs come with chrome-lined barrels from the factory. Chrome provides corrosion resistance, easier cleaning, and longer barrel life – 20,000-plus rounds versus 10,000-plus for unlined. The trade-off is a slight accuracy penalty that does not matter for a fighting rifle. If your AK has an unlined barrel and you want chrome, you need a new barrel.
Pro Tip: When buying parts, specify your exact model. “AK-47” is a generic media term. For parts compatibility, “AKM,” “WASR,” “NPAP,” or “SAM7” matters more. The AK platform has dozens of variants that look identical but have different specs.
Extended Reference: AK Platform Configurations
This section covers variant-specific information, torque values, ammunition, and tools that apply across all AK troubleshooting work.
Quick Reference Tables
Keep these numbers handy when working on any AK.
Note: These are common AKM-pattern reference values. Confirm against your exact rifle, caliber, bolt, and manufacturer documentation before treating any number as a service limit.
| Spec | Standard AKM | Notes |
|---|---|---|
| Firing pin protrusion | 0.028″ – 0.035″ | Common reference range; confirm by model. < 0.025″ causes light strikes on reference bolts |
| Headspace Go gauge | Bolt closes fully | Minimum safe headspace |
| Headspace No-Go gauge | Bolt should NOT close | Maximum service headspace |
| Recoil spring free length (new) | ≈ 15.5″ (common AKM-pattern reference; confirm by manufacturer) | Replace if below reference length for your spring design |
| Gas port diameter | 0.150″ – 0.160″ (common AKM-pattern reference range) | Do not enlarge without armorer-level diagnosis. Confirm by model |
| Extractor spring tension | Firm finger compression | Weak = replace immediately |
Torque Specifications and Measurements
AKs do not have published torque specs like ARs. Most fasteners are rivets or press-fit pins. Key dimensions:
- Barrel pin (4.5mm or 5.5mm): Press-fit. Requires hydraulic press to install or remove.
- Front trunnion rivets: Swaged. Hydraulic press with proper dies required.
- Gas block pins: Drifted. Can be removed with pin punch and hammer.
- Extractor retaining pin: Drifted with small punch. Not torque-sensitive.
Ammunition Compatibility
| Caliber | AK Variant | Bullet Diameter | Notes |
|---|---|---|---|
| 7.62x39mm | AK-47, AKM, WASR, NPAP | 0.311″ | Most common; steel and brass available |
| 5.45x39mm | AK-74, AKS-74 | 0.220″ | Flatter trajectory; corrosive surplus common |
| 5.56x45mm (.223) | AK-101, Arsenal SAM5 | 0.224″ | NATO compatible; requires dedicated magazines |
| 7.62x54mmR | PKM, RPK variants | 0.312″ | Rimmed cartridge; different magazines |
Common Tools and Supplies
| Tool/Supply | Purpose | Recommended Type |
|---|---|---|
| Chamber brush (7.62×39 or 5.45×39) | Removes baked carbon from chamber walls | Caliber-specific chamber brush |
| Bore snake | Quick bore cleaning between range trips | Brass weight, caliber-specific |
| Headspace gauges | Safety verification after bolt work | Forster or Clymer Go/No-Go set |
| Pin punches (metric 2-5 mm) | Detail strip and pin driving | Brass or polymer punches |
| CLP or gun oil | Bolt rails, FCG pins, safety detent | BreakFree CLP, Slip 2000 EWL |
| Brake parts cleaner | Aggressive carbon removal | Non-chlorinated aerosol |
| Brass hammer | Pin driving, assembly | 12-16 oz head |
Lubrication Points and Procedures
Apply light oil: Bolt rails on the carrier, hammer and trigger pivot pins, safety lever detent path, magazine catch.
Run dry: Firing pin channel, gas piston and tube, chamber. Oil in these locations attracts carbon and turns to sludge or burns away instantly under gas heat.
Apply grease: Sear and hammer engagement surfaces, bolt cam track. A thin coat of grease reduces wear without migrating under heat.
Understanding AK Safety Systems
The AK safety lever blocks the trigger and covers the ejection port. When engaged, the lever physically prevents the trigger from moving rearward. The ejection port coverage prevents debris from entering when the rifle is carried. The safety is not a drop safety; if the rifle is dropped hard on the hammer with the safety off, the firing pin may strike the primer. Always carry with the safety engaged unless actively engaging targets.
Problem Solved
The AK platform is reliable because its operating system is simple: a long-stroke gas piston, generous clearances, and robust parts. Simplicity tolerates neglect better than complexity, and a simple system is easier to diagnose when it does fail. But tolerance is not the same as immunity. Extractors wear, springs weaken, chambers foul, and headspace creeps. Treat your AK like the machine it is, inspect it regularly, and it will keep running.
Quick FAQ
What should I check first when my AK has a feed problem?
For feed-related AK malfunctions, magazines are the first thing to test. Worn feed lips, weak springs, poor fit, and bad followers cause a large share of feeding problems. Before blaming the rifle, test with several known-good magazines.
Can I fix my AK myself?
Yes. For most common failures. Extractor replacement, spring swaps, deep cleaning, and recoil spring replacement are all within the reach of a patient owner with basic tools. Headspace work, barrel replacement, and receiver repair require a gunsmith.
Do I need armorers tools for basic maintenance?
No. Basic field maintenance requires only a chamber brush, bore snake, patches, solvent, and lubricant. Detail work requires metric pin punches and a brass hammer. Armorer-specific rivet presses are only needed for building or receiver repair.
When should I clean my AK?
After every range trip if you shoot steel-case ammo. More often with steel-cased ammunition, especially if extraction starts feeling sticky. At reasonable intervals with brass-cased ammunition, based on use, fouling, and reliability. If you run corrosive surplus, clean the same day.
Final Thoughts: Confidence Through Competence
The AK platform earned a reputation for reliability because the system is simple, not because it is magic. Simplicity tolerates neglect better than complexity, but tolerance is not the same as immunity. It is still a machine. Machines wear. Machines fail. The moment you think your AK is invincible, you are gambling.
This guide gives you a blueprint: Symptom ➔ Diagnosis ➔ Fix. No guesswork. No theory. Just what works from decades of working on guns.
Clean your rifle. Replace worn parts. Use quality magazines. Never ignore warning signs.
Because that small stuff? It is what separates a range headache from a real-world failure.
You do not need to be an armorer to keep your AK running. You just need to be someone who gives a damn.
You are. And now, you are armed with the knowledge that proves it.
Disclaimer
This guide covers standard AK/AKM pattern rifles with the long-stroke gas piston operating system. Manufacturer-specific variations, including Yugo-pattern rifles with different magazine wells, milled receivers, and non-standard trunnion sizes may require manufacturer-specific documentation.
Legal: Replacing imported parts on a foreign-made rifle may affect 922(r) compliance. If your rifle is built from a parts kit or imported as a complete firearm, keep track of how many foreign parts remain after each swap. Most U.S.-made extractors, springs, and FCG components count as compliance parts, but consult current ATF guidance or a licensed dealer if you are unsure.
When in doubt, consult a certified gunsmith with AK receiver experience.
Last reviewed: June 2026.
YouTube Companion Description: This companion guide walks through common AK troubleshooting symptoms, inspection points, cleaning checks, maintenance signs, and when to consult a qualified AK gunsmith. It is built as a symptom-first reference guide for responsible owners who want to understand what their rifle is telling them. For detailed step-by-step repair procedures, bench inspection techniques, and parts replacement guidance, visit trb.fyi.